Subscribe via email

Enter your email address:

Delivered by FeedBurner

Wednesday, June 30, 2010

Sneak Peak - Greenhouse Gala DSP


Just 1 more day till the new catalog premieres!!!! My customers are already raving about the wonderful new products and the catalog itself.

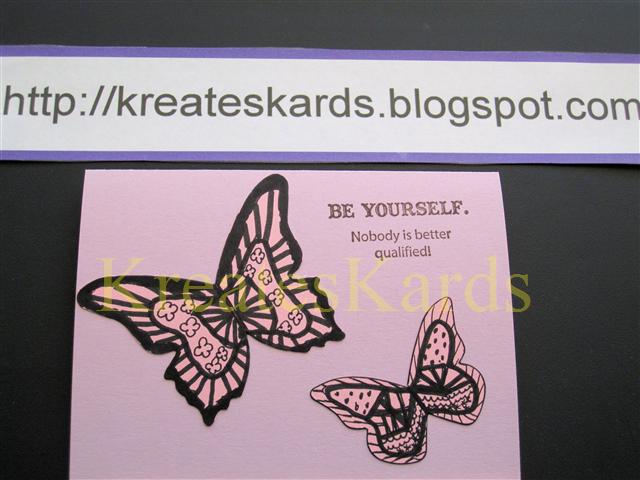
I wanted a scallop rectangle design but didn't have a paper punch or Big Shot Die that was the right size. So here is what I did: I punched out 6 Scallop Square - Extra Large designs (item #119884) and glued them together by overlapping the edges. Ended up being the perfect shape and size that I wanted.

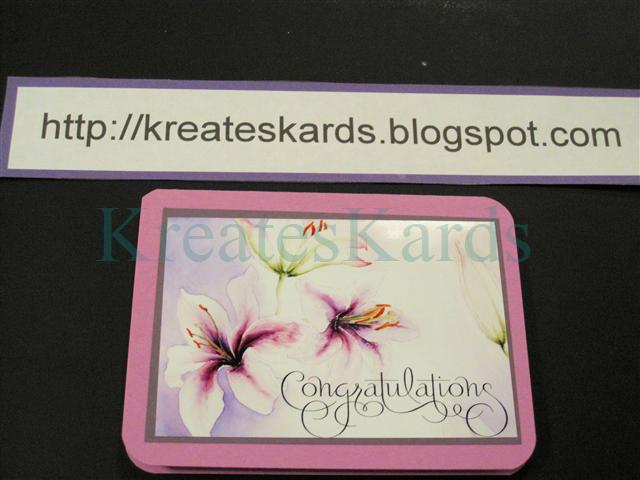
Did you notice the center design of the card? It was made using Greenhouse Gala DSP (item #117167) and a Clearlit called Scallop Rectangle, item # 118872 in the new catalog. The Clearlit is 2 1/4" x 2 1/2" and has a clear window in it so you can position it over the exact image you want to cut out with the Big Shot. It uses the same sandwich as the Sizzlits dies. Won't it be fun to use on photographs, designer series paper, and more. I really like the delicate scallops around the edge of the rectangle. By using the Clearlits die I was able to place it directly over the exact flower image I wanted to cut out.

Colors of card stock used on this card:
Old Olive, item #100702
Early Expresso, item #119686
Greenhouse Gala DSP, item #117167

Accented card with the 1/8" Daffodil Delight taffeta ribbon, item #119254

Card made with 100% Stampin' Up! products. You can't beat the quality!!!! If you would like to purchase an Stampin' Up! products from me, you may order 24/7 thru my on-line Stampin' Up! website by clicking HERE then click on Shop Now or by contacting me directly. Items shown as "sneak peeks" are not available until noon (Mountain Daylight Savings Time) on July 1st.

Mary
http://marydirector.stampinup.net
Stampin' Up! -- Discover Your Creativity
(On-line ordering now available thru my website)

Tuesday, June 29, 2010

Background Whimsy - Technique Overview


Background Whimsy is a technique I learned from the Technique Junkie Newsletter. Amazing how different you can make a background image using it.

Overview of how it is done:
Stamp your image(s) on glossy white paper using waterproof ink.
I used a dauber to randomly color in the areas.
Then used the Stampin' Up! Uni-Ball Signo Gel Pen (opaque white) to highlight areas on the design. (item #105021).

Think of all the great designs and original background paper you can create with this technique.

Mary
http://marydirector.stampinup.net
Stampin' Up! -- Discover Your Creativity
(On-line ordering now available thru my website)

Sunday, June 27, 2010

Monday Inspiration: Sneak Peak DSP

Here's a great example of how the DSP (Designer Series Paper) and the stamp set work right together. They were designed to work hand in hand with each other. The items used in this card are 100% from the new Stampin' Up! 2010-2011 Idea Book & Catalog that will premiere on July 1st.

Card Base: Daffodil Delight, item #119683
DSP: Greenhouse Gala, item #117167
Stamp Set: Friends Never Fade, item #118750 in Wood and item #120618 in Clear Mount. This stamp set is part of Shelli's Signature Collection*
Classic Ink: Early Expresso, item #119670
Ribbon: 1/8" Taffeta Ribbon, item #119254

I used the taffeta ribbon at the base of the DSP and threaded it thru the card after punching small holes using our handheld paper punch 1/16" circle, item #101227.

*Shelli's Signature Collection are products that reflect Shelli Gardner's personal style.

Mary
http://marydirector.stampinup.net
Stampin' Up! -- Discover Your Creativity
(On-line ordering now available thru my website)

Monday Inspiration: New Catalog

When you see the new Stampin' Up! 2010-2011 Catalog you will be so inspired to be creative. There are many new products and new features in the catalog too. Here are two of my favorite new features in the catalog:

1. A stamp is outlined in red if there is a Stampin' Up! paper punch that work with it. Then just below it lists the name of the punch and where you can find it in the catalog. Isn't that wonderful!!! I love this new feature. No more guessing if a stamp set will work with a specific paper punch.

2. When DSP (Designer Series Paper) has a stamp set that matches it, the stamp set is listed with the DSP so that you can match them up.

This is our biggest catalog to date. I think it is our BEST too. I have my catalog loaded with post-it notes already to be able to order on July 1st after noon. The on-line ordering system will be down until noon (mountain daylight savings time).

If you are a customer of mine, your catalog is in the mail to you IF you placed an order in the last year with me. There is NO charge for the catalog to my customers who have placed orders thru me during the last year. So if you don' t already have a demonstrator and would like a FREE catalog sent to you, please place an order thru my website (CLICK HERE then click shop now) and I will send one to you. NOTE: The FREE catalog promotion is my personal promotion not a promotion sponsored by Stampin' Up!.

Mary
http://marydirector.stampinup.net
Stampin' Up! -- Discover Your Creativity
(On-line ordering now available thru my website)

Thursday, June 24, 2010

2010 - Idea Book & Catalog - 2011: Stampin' Up!

Part of my shipment of the NEW 2010 - Idea Book & Catalog - 2011 arrived today. Hopefully the rest of the catalogs will be delivered tomorrow afternoon. I'm so excited and can't wait to share them with all of you.

If you have placed a Stampin' Up! order using me as your demonstrator between July 1, 2009 and June 30, 2010 (that is next Wednesday), you will automatically received a new catalog from me. If you have not ordered thru me before, you still have time to qualify for a free catalog. Just place an order using me as your Stampin' Up! Demonstrator by June 30th, and I will mail you a catalog at no charge. This is a personal promotion and is NOT a Stampin' Up! promotion. As a demonstrator, I actually purchase and pay for the mailing of all catalogs that I send out. It is my way of saying THANK YOU to my customers for purchasing their Stampin' Up! products thru me.

It's easy to place an order by going to my Stampin' Up Website by CLICKING HERE then click on Shop Now in the upper right of the screen.

There are so many wonderful new products in the catalog. I truly think it is the BEST catalog yet. These catalogs are good for one full year. It is loaded with ideas, products, and has 224 pages.


Mary
http://marydirector.stampinup.net
Stampin' Up! -- Discover Your Creativity
(On-line ordering now available thru my website)

Monday, June 21, 2010

Monday Inspiration: Do you Zentangle?

Monday Inspiration: It is fun. It is easy to do. It is Zentangle. Let yourself go and create a card using Zentangle.

No idea what Zentangle is. Me neither, up until recently. Here's some background on this technique:

http://www.zentangle.com/about-what-is--1.php
"What is Zentangle? Zentangle is an easy to learn method of creating beautiful images from repetitive patterns. It is a fascinating new art form that is fun and relaxing. It increases focus and creativity. Zentangle provides artistic satisfaction and an increased sense of personal well being. Zentangle is enjoyed by a wide range of skills and ages and is used in many fields of interest. We believe that life is an art form and that Zentangle is an elegant metaphor for deliberate artistry in life. "

After seeing a few samples, it hit me: Wow, I use to do this as a kid. In fact, I loved doing it as a kid so why not try again. Here are my first attempts at this.


This one I just took white card stock and started to doodle. Used Elegant Eggplant Stampin' Write Marker.

Then decided to try it with images cut out with the big shot:

Butterflies were my favorite so far. I used both the fine and bold tips of the Stampin' Write Basic Black Markers on the butterflies and the following cards.


Star shape Zentangled.


This one is two of the Big Shot Scallops Zentangled and then layered. Thought it looked a bit like a flower.

If you got to YouTube, you will find many videos on this technique too. There is no right or wrong way to create a Zentangle. They are fun too to incorporate into a card. Hope this has inspired you to try and make some too. CLICK HERE for videos on YouTube.

You can shop with Stampin' Up! 24/7 on my Stampin' Up! Website by clicking HERE.

Mary
http://marydirector.stampinup.net
Stampin' Up! -- Discover Your Creativity
(On-line ordering now available thru my website)

Saturday, June 19, 2010

Sneak Peek - Because I Care Hostess Stamp Set

Had to share with you some new colors today too along with this great stamp set called "Because I Care". This is a level 1 Hostess Set that can be earned as a customer or as a hostess as of July 1st. It comes in wood mount and clear mount and is a 5 piece set.

The new colors in the card are Wild Wasabi, item # 108641, which is the green AND Concord Crush, item #119792, which is the purple card stock. I used my Stampin' Markers to color in the stamp using Old Olive - item #100079 and Perfect Plum - item #100035.

I actually made two cards almost identical. The first is the one shown above. The 2nd is shown in the following photos ... do you notice a difference?


The difference is that on the 2nd card I stamped out tiny flower image 16 times. The image is part of the stamp set. I applied pressure in the middle of each flower to curl the edges up and then using a glue dot secured them to the flower. It really gives it depth and dimension.

If you didn't have a tiny stamp, you could stamp the larger image a few times then punch it out tiny flowers with a paper punch like the ones use HERE.

The new items showcased above will be available as of July 1st. Hope you are as excited as I am about them. Stampin' Up! always give us quality products, and you are going to LOVE the new catalog. Anyone who has placed an order using me as their demonstrator from July 1, 2009 thru June 30, 2010 automatically receives their catalog for FREE as a gift from me. There is still time to get your order in, so you will receive a FREE catalog too. Again, this is my own personal gift to my customers .. it is NOT a promotion from Stampin' Up!.

If you would like to place an order, CLICK HERE then click on Shop Now to place your order.

Hope you have a wonderful weekend.

Mary
http://marydirector.stampinup.net
Stampin' Up! -- Discover Your Creativity
(On-line ordering now available thru my website)

Friday, June 18, 2010

Sneak Peek - Impression Folder Mini Tutorial

One Big Shot product that is always a major hit with my customers are the Textured Impression Embossing Folders. The one pictured above is a Sneak Peek of the one called Vintage Wallpaper, item #120175. I love the deep impressions this folder makes. Wait till you see the next photo and how I was able to transform it. I used Bashful Blue Card Stock, item #105120. There is a 2nd one that I don't have yet, called Elegant Lines - item #119277. Can't wait to get that one too.


Doesn't this look like Wedgewood? Amazing what you can do just by adding a bit of ink. It is amazing how the pattern stands out even more.

NOTE: What appears to be white above is actually the Bashful Blue paper. The blue tone is a direct result of the Marina Mist Classic Ink being applied to the impressions folder.

Here's a quick mini tutorial for you:

1. Cut a piece of Bashful Blue Card Stock 5 1/2 x 4 1/2, set aside.
2. Ink a brayer using Marina Mist Classic Ink, item #119668. Remember to roll only in one direction on the ink pad. That way the complete brayer will be inked.
3. Roll the inked brayer over the "depressed" inside of the impressions folder.
4. Place the card stock over the inked side, and close folder.
5. Place the folder in the Big Shot and crank thru using the proper "sandwich".
6. Gently remove the paper and set aside to dry.
7. Rinse off the brayer and impressions folder. I ran mine under cold water. You can spray too with Stampin' Mist if needed. Pat dry, then allow to air dry before putting away.

I think this will make an amazing background for a card, don't you?

The Sneak Peek items will not be available until July 1st. You may order Stampin' Up! products by contacting me directly or by placing an order thru my on-line store. CLICK HERE.

Mary
http://marydirector.stampinup.net
Stampin' Up! -- Discover Your Creativity
(On-line ordering now available thru my website)

Thursday, June 17, 2010

Thoughts & Prayers Stamp Set Product Review

We all have times in our lives that we need a card to express sympathies, prayers, thinking of you, or get well soon. I think that the Stampin' Up! Stamp set is the perfect set for this type of card. It has a tree (shown above), a branch of flowers and the following sentiments:

Thinking of You, Please know that I care.

Sharing in your Sorrow

Praying for friends
to comfort you,
faith to hold you,
and loving memories
to heal your heart.

Wishing you a quick and
complete recovery.
GET WELL SOON

Praying
for
You

Sending thoughts of love and
praying for the Lord to sustain you
with bright and restful days.

Thoughts & Prayers stamp set, item #113252 and is a set of 8 stamps.

In the card above, I also used the stamp set called Pocket Silhouettes, item #111672 for the border of flowers on the bottom. The baby wipe technique was used for the background. See my blog post from June 14th to see how to create this background.

Have you tried ordering on-line yet thru my Stampin' Up! website? It's easy to do, just CLICK HERE, then click on Shop Now to place your order.

Mary
http://marydirector.stampinup.net
Stampin' Up! -- Discover Your Creativity
(On-line ordering now available thru my website)

Wednesday, June 16, 2010

Sneak Peek - Cute by the Inch Stamp Set

Cute by the Inch Stamp set is a level 2 Hostess Stamp Set. It is a set of 9 one inch designs. It is one of my favorite sets in the new Stampin' Up! catalog, and I couldn't wait to try it.


Marina Mist, Cajun Craze, Cherry Cobbler
(colors left to right)

Here's a close up of 3 of the designs. They are linked together with Marina Mist 1/8" Taffeta Ribbon, item #119257. I sponged the edges of the Whisper White Card Stock with Marina Mist Classic Ink.

Colors used for this card:
Marina Mist Classic Ink Stamp Pad, item #119668
Cherry Cobbler Classic Ink Stamp Pad, item #119669
Cajun Craze Classic Ink Stamp Pad, item #119671
Marina Mist Card Stock, 8 1/2 x 11, item #119682
Whisper White Card Stock, 8 1/2 x 11, item #100730

The Cute by the Inch Stamp Set can be earned for FREE by placing a minimum $300 order either yourself or in a group workshop as the hostess. Along with the FREE stamp set, you would also earn a minimum of $35 in free merchandise of your choice from Stampin' Up! Whether a hostess or a regular customer, you are eligible for FREE gifts when minimum requirements are met. To read more about our benefits for hostesses and/or customer, please CLICK HERE.

Just a reminder that the items in the Sneak Peek above cannot be ordered until July 1st when our new Idea Book & Catalog 2010 - 2011 premieres. Orders may be placed on-line thru my website by CLICKING HERE and then clicking on Shop Now.

Mary
http://marydirector.stampinup.net
Stampin' Up! -- Discover Your Creativity
(On-line ordering now available thru my website)

Tuesday, June 15, 2010

Sneak Peek - Card for Baby Boy

My completed card.


I used the Wheel and rolled the design across the complete bottom of the card.


The new scallop circle layered with our smaller scallop circle punch.


The anticipation of the new Stampin' Up! Idea Book & Catalog 2010 - 2011 is building. The catalog will premiere on July 1st -- only 14 days to go. I can't wait to show you all of the wonderful things in it.

Here's the Sneak Peek items used for this card:

2 3/8" Scallop Circle Extra-Large Punch (item #118874) -- - this works perfectly with our 1 3/4" Scallop Circle punch (item #119854).

Baby Tees Jumbo Wheel (item #118621) --- I rolled this out, then colored in using our Watercolor Pencils (item #101879) which has 24 assorted colors.

Baby Bundle Stamp set (item #118525 - Wood Mount OR item #120576 Clear Mount) --- it has some great stamp designs (16 stamps) for baby such as a carriage, teddy bear, duck, onesie, bib, heart, bottle, and sentiments. You can even make your own baby shower invitation with it.

I love paper punches, and Stampin' Up! has added more to their catalog this time. Besides the 2 3/8" Scallop Circle punch, there is also a Two-Step Owl (item #118074), a Bat (item #119279) perfect for Halloween, and a Dotted Scallop Ribbon Border Punch (item #119275). I can't wait for July 1st so I can order the rest of the punches. There is even a Punch Caddy that is used to store the trim-line punches.

More sneak peeks in the days ahead.

Remember you can order 24/7 thru my Stampin' Up! website by CLICKING HERE, then click on Shop Now. Last Chance and discontinued items are going fast. Many are available while supplies last and the last day to order if still available is June 30th. Don't miss out.

Mary
http://marydirector.stampinup.net
Stampin' Up! -- Discover Your Creativity
(On-line ordering now available thru my website)

Monday, June 14, 2010

Monday Inspiration: Baby Wipe Background Technique Mini Tutorial

This beautiful background is made using glossy white paper, a folded baby wipe, and 3 colors of Stampin' Up! In Refills.

Added in stamped images, ribbon, and a sentiment tag. Doesn't it make a great card. I'm so pleased with the results. This is my first time using this technique. It was easy to do.

Mini Tutorial:
1. Score your card base at 5 1/2". Fold with bone folder and set aside.

2. Cut a piece of glossy white paper (item #102599) 3 3/4" x 5"

3. Fold the baby wipe a couple of times, put drops of ink on the folded edge. I used 3 colors and put them in sequence from left to right (Bashful Blue- item #105221; Pretty in Pink - item #102295; and Certainly Celery - item #105230). Wipe across the paper. You may need to move down and wipe again to cover the complete piece of paper. Allow to dry.

(NOTE: You will get ink on your fingers. I always work with plastic and paper towels under my glossy paper too just in case of spills, leaks, or excess moisture).

Basic Black, Classic Ink .. item #101179 was used for the stamped things in the following steps:

4. I used 2 step stamping for the tree/ground and the wolf. The stamp set I used is called Nature Silhouettes, item #111542. Two Step Stamping Technique Tutorial can be seen HERE. Stamp the tree image first, then the wolf.

5. Attach the 5 1/2" piece of Old Olive 5/8" Satin Ribbon, item #117292.
(Use Sticky Strip, item #104294).

6. Stamp the sentiment on the piece of Dusty Durango Card Stock (1 1/4" x 3"), item #115321. Use the Tag Corner Paper Punch, item #107215 on all 4 corners. Put 4 dimensionals, item #104430 on the tag and center on the ribbon.

7. Using Sticky Strip, item #104294 attach your background piece to your card base.

Card is now complete.

The baby wipe technique is a great way to create sunsets, sunrises, and beautiful color combinations. I hope you will try this technique to see what you can create.

It is easy to order 24/7 for any Stampin' Products you might need. CLICK HERE and then click on Shop Now to place your order.

Mary
http://marydirector.stampinup.net
Stampin' Up! -- Discover Your Creativity
(On-line ordering now available thru my website)

Thursday, June 10, 2010

Creative Fun With My Digitial Studio

Earlier I posted HERE about usingStampin' Up!'s My Digital Studio (MDS) and the Summertime Splendor DSP, item #121067.

I would like to thank PattyStamps.com for her tutorial on how to set up 4 items to a sheet then cutting them out as card fronts.

After watching her tutorial, I had to create some more cards of my own using MDS. I had such fun creating these. The photo and the sentiment are all completed thru MDS. I printed them out using my inkjet color printer using photo quality paper.


I added in card stock to shadow the photo and then using SNAIL adhesive attached that to the card base in a complimentary color. So pleased with the results.

My Digital Studio (MDS) is available for sale thru my Stampin' Up! website by clicking HERE then clicking on Shop Now. The item number is 118108.

I really enjoy doing hybrid projects where you combine items created in MDS with other things I've created with card stock like the cards above.

Mary
http://marydirector.stampinup.net
Stampin' Up! -- Discover Your Creativity
(On-line ordering now available thru my website)

Monday, June 7, 2010

Monday Inspiration: Spotlight Technique Tutorial

Isn't it fun to learn new techniques! This is one of my favorites. It is called Spotlight Technique and is perfect for our Monday Inspiration.

This is my finished card using the spotlight technique.


Stampin' Up! Products used:
Stampin' Up! Classic Ink, your choice of color (I only used Chocolate Chip)
Stampin' Up! Card Stock, your choice of color (I used Dusty Durango, Very Vanilla, and Barely Banana --- use 3 colors with one being very light for the spotlight)
Heard From the Heart Stamp Set, item #111644
Lovely as a Tree Stamp Set, item #115026
Paper Punch 1" Circle, item #109046
SNAIL Adhesive, item #104332
Vintage Brads, item #109109
Mat Pack, item #105826
Paper-Piercing Tool, item #116631
Sticky Strip, item #104294


Stamp the identical image on two pieces of card stock, one a lighter color than the other. I chose Very Vanilla for my "spotlight" color.


Here's the completed stamped images.

Using your 1" circle punch, punch out 3 images from the Very Vanilla card stock.


The 3 images you punched out will now be a perfect match for your design on the darker card stock.

I used SNAIL adhesive to adhere the spotlight images to the darker card stock. Another way to add interest to your spotlight image is to color it with Stampin' Pastels (chalks), Watercolor Pencils, or Watercolor Wonder Crayons.

Using my Mat Pack and Paper-Piercing Tool, I punched 4 holes (1 in each corner). Then adding in the Vintage Brads.

Here's the finished spotlight piece. It will be added to the card base using Sticky Strip.

Now you are ready to stamp your sentiment to the card base.


I'm very pleased with how this card turned out.

The spotlight technique can be used with any stamped image. Think of all the designs you could use from the stamp sets you have to create this spotlight for your card or scrapbook.

Are you a night owl like me? When the creative urge hits, and I know I need to order some supplies; I love that I can order on-line 24/7 with Stampin' Up!. What Stampin' Up! products are you running low on? You can order them right now by going to my Stampin' Up! website by clicking HERE. Then click on Shop Now.

Mary
http://marydirector.stampinup.net
Stampin' Up! -- Discover Your Creativity
(On-line ordering now available thru my website)

Thursday, June 3, 2010

Stampin' Around Wheels Tutorial

Have you ever used the Stampin' Up! wheels before? Were you aware that we have 3 different sizes: Standard, Jumbo, and Wheel Builder? The Stampin' Around Wheel Builder Wheels were just introduced in our new Summer Mini Catalog (see Pg 8 and 9).

There are so many things you can do with the wheels to create unique and special scrapbook pages and cards. Today I want to show you how to use the Standard Wheel. (same steps for Jumbo Wheel also).

Stampin' Up! Products:
Stampin' Around Handle, standard, set of 2, item #102971
P is for Paw, Stampin' Around Wheel, item #115620
D is for Dog Stamp Set, item #115784
Stampin' Up! card stock of your choice
Stampin' Up! classic ink of your choice


Here is the stamp set and Stampin' Around Wheel (standard size).

The wheel just pops into the handle, pops out when done.
You can purchase ink cartridges that are the perfect size to fit the standard or jumbo handles. The cartridges are recommended if you are doing a scrapbook page. If doing a card, the cartridge can be used but is not necessary.


Let's begin.
Going in the same direction, roll your wheel over your classic stamp pad numerous times. By going the same direction, you will put ink on all of the design on the wheel.

Starting off the edge of the your card, firmly grip the wheel and roll it away from you. Be sure to end off the edge of the card when finished.
Re-ink your wheel before starting a new row.

Follow the same directions as above being sure to start and end off the edge of your card.


Next I stamped the dog from the D is for Dog stamp set. You could color in or add glitter to his collar for more details.


Next I added in a paw print (single stamp from the D is for Dog stamp set) and the sentiment.

Card was easy to make and is perfect for the dog lover in your life. Stampin' Up! also has a stamp set for cat lovers too. It is called: C is for Cat, item #115764. It has a paw print, fish, cat, "C is for Cat", "So sorry for the loss of your little friend.", and "as every cat owner knows, nobody owns a cat - Ellen Perry Berkeley.

To clean your wheels after using with a stamp pad: Spritz wheel with Stampin' Mist, item #102394 and roll it across your Stampin' Scrub, item #102642 first in the wet area then in the dry area. Repeat if needed.

Storage of the Wheels: The wheels can be stored in the Stampin' Around Wheel Storage. It comes in two different sizes:
Standard, set of 2, stores 10 wheels .. item #105743
Jumbo, set of 2, stores 6 wheels .. item #105741

The Stampin' Around Wheels are a great way to create borders, backgrounds, and even your own designer series papers.

It's easy to order your Stampin' Up! products from me on-line, just CLICK HERE to access my Stampin' Up! website. Then click on Shop Now.

Mary
http://marydirector.stampinup.net
Stampin' Up! -- Discover Your Creativity
(On-line ordering now available thru my website)

Tuesday, June 1, 2010

Stampin' Up! Last Chance List, Retirements, Becoming a Demonstrator

Stampin' Up! announced the list of stamps that it will be retiring as well as accessories that it will no longer be carrying. Be sure to check out the list on my Stampin' Up! website, they are under the promotions area. CLICK HERE

If there is anything you want from these lists, I highly recommend that you order it NOW. If you wait, there may be a chance it will be sold out. Items are sold on a "While Supplies Last" basis. When you order on-line thru my website you order goes in immediately and is easy to do. Just have your items number ready before signing in. CLICK HERE to place your order, then click Shop Now.

New catalog will be mailed to my customers at the end of June. Anyone who orders from me between July 1 , 2009 and June 30, 2010 will receive their Stampin' Up! Idea Book and Catalog for FREE. All you have to do is placed an order using me as your demonstrator. CLICK HERE to place an order, then click on Shop Now.

Please let me know if you are interested in becoming a Stampin' Up! demonstrator. Stampin' Up! has 3 different starter kits now being offered. One kit is $99 !!!!! It is a great way to get started with the company either as a hobby demonstrator or as a business demonstrator. Additional information about becoming a demonstrator can be found on my website, just CLICK HERE

$99 Starter Kit Promotion

From June 1-30, 2010, you can start your own Stampin’ Up! business for just $99 with the special Mini Starter Kit!

The Mini Starter Kit—valued at over $180—contains the items listed below; while all items are recommended, you can substitute a like item of equal or lesser value.

  • Watercolor Trio stamp set (wood-mount)
  • I {Heart} Hearts stamp set (clear-mount)
  • Clear-Mount Block C
  • Homemade single stamp*
  • Whisper White card stock (8-1/2” x 11”)
  • Brights Collection assorted card stock (8-1/2” x 11”)*
  • Melon Mambo Classic Stampin’ Pad
  • Daffodil Delight Classic Stampin’ Pad*
  • Rich Razzleberry Classic Stampin’ Pad
  • Tempting Turquoise Classic Stampin’ Pad
  • Basic Black 1/8” taffeta ribbon*
  • Color Coach*
  • SNAIL Adhesive

*Sneak peek items!

The Mini Starter Kit also includes the same business supplies that are in the standard Starter Kit. Plus, new demonstrator who join Stampin’ Up! in June, you will receive a free box of 2010-2011 Idea Book and Catalogs during the first part of July!

From now until June 15th I am working 12 to 14 hours a day. I am checking e-mails 2 to 3 times a day. So please e-mail me if you have any questions. I will have a regular schedule after the 15th.

Mary
http://marydirector.stampinup.net
Stampin' Up! -- Discover Your Creativity
(On-line ordering now available thru my website)

You May Also Like:

Blog Widget by LinkWithin