Subscribe via email

Enter your email address:

Delivered by FeedBurner

Showing posts with label String Art. Show all posts

Thursday, July 14, 2011

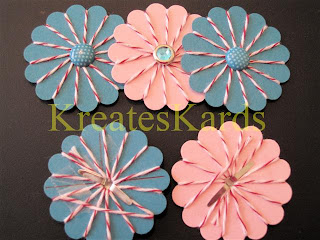
Baker's Twine Flowers

My bouquet of flowers.

Top row is the front side, bottom row is the back. 
I wanted to show you the threading/wrapping I did after punching a hole in the center of the scallop circle.  I secured the twine ends with small pieces of scotch tape.

Stampin' Up! Products Used:
Crop-A-Dile, item #108362
Designer Printed Brads - 2011-2012 In Color, item #122940  (did you see the polka dots)
Baker's Twine - Cherry Cobbler/White, item #123125
Circle Ice Rhinestone Brads, item #109111
1 3/4" Scallop Circle Paper Punch, item #119854
Any color card stock you would like to use.

You may order from my Stampin' Up! website 24/7 by CLICKING HERE, then click on Shop Now or by contacting me directly. My e-mail link is at the top of the screen.

Mary Director
Stampin' Up! Senior Supervisor, Independent Demonstrator & Creative Coach
http://marydirector.stampinup.net
Stampin' Up! -- Discover Your Creativity
(On-line ordering now available thru my website)

Wednesday, September 8, 2010

Back to Basics: Creating Card Layers - Sizes

Layering of card stock can add such a great look to any card that you are creating. I typically do mine in 1/2" or 1/4" increments.

Judy Marshall has a post on her blog about layering and she also lists the dimensions needed. I am only going to list part of the information here, so click on the link to view the rest on her blog.

For a 5 1/2" x 4 1/4" card base:
Layers:
...Layer 1 - 5 1/4" x 4"
...Layer 2 - 5" x 3 3/4"
...Layer 3 - 4 3/4" x 3 1/2"
...Layer 4 - 4 1/2" x 3 1/4"

I know you will find this information very helpful in your card creation. Judy has all different size card and their layers posted on her blog, please take a minute to see what she has posted by clicking here.

The holiday season is just around the corner. Now is the time to sit down and make up your list of the products you need for all your holiday needs from now thru the New Year. Then go to my Stampin' Up! website and place your order by CLICKING HERE, then click on Shop Now. Your holiday cards are going to be perfect when you use the quality products from Stampin' Up!. Remember too that if you have questions, I'm just a phone call or an e-mail away.

Thank you for stopping by my blog today.

Mary Director
http://marydirector.stampinup.net
Stampin' Up! -- Discover Your Creativity
(On-line ordering now available thru my website)

Thursday, April 29, 2010

Sentimental Journey Stamp Set Cards

Remember the scrapbook layout I posted yesterday on my blog, well I took the same elements and made it into 4 cards. In the process I am also trying to use colors that will be retired as of 1 July. You will see an intermix of current and soon to be retired colors in the cards below. For a complete list of retired colors and new colors ... CLICK HERE. (there are two posts pertaining to the color changes - be sure to scroll down after you click on the link).

All the cards below were made using the NEW stamp set called: Sentimental Journey.
Item #118513 - Wood Mount
Item #120075 - Clear Mount

The stamp set is being offered in the Summer Mini Catalog that premieres as of Saturday, May 1, 2010.


Card Stock: Barely Banana, Pale Plum, Whisper White
Brads: So Saffron
Classic Inks: Bordering Blue, Ruby Red


Card Stock: Bermuda Bay, Ruby Red, Whisper white
Classic Ink: Brocade Blue, Chocolate Chip, Ruby Red
Ribbon: 1/2" Polka Dot Grosgrain Ribbon, Bermuda Bay


Card Stock: Brocade Blue, Ruby Red, Whisper White
Classic Ink: Brocade Blue, Ruby Red
Ribbon: Organza Ribbon Whisper White
Brads: Gold Brads


Card Stock: Dusty Durango, Bermuda Bay, Whisper White
Classic Inks: Old Olive, Pumpkin Pie

As you can see, this stamp set is very versatile and may be used for many occasions.

Thank you for stopping by and viewing my blog today.

Mary
http://marydirector.stampinup.net/
Stampin' Up! -- Discover Your Creativity
(On-line ordering now available thru my website)

Tuesday, April 27, 2010

Cards and Chipboard Ideas

Updated: Thursday, April 29th. This is an updated version of the On Board Scallop Circle ... I added in a monogram that was punched out with the Scallop Circle Punch. It's a perfect fit for this wall hanging.


Today I wanted to share some of my creations with you. Not only are there cards, but I also did some things with Stampin' Up! chipboard.

On Board Scallop Circle Book (6" diameter), item # 118306 ... Occasions Mini Catalog
Jumbo Brads, item #112534
Designer Series Paper

I punched holes all the way around the scallop, created my string art design, then put a Jumbo Brad in to close the whole. Really like the star effect this made. I'm going to put a magnet on the back OR attach a ribbon to hang from a hook.

This is the On Board Scaloop Circle Book mentioned above also. Just changed the number of punches and the string art. The string art reminded me of a butterfly so added in the shapes using a BigZ die that is exclusive to Stampin' Up! called Beautiful Butterflies, item #114507.

The small Vanilla rectangle holder with brads is from the Hodgepodge Hardware kit, item #112454 (Vanilla).

A paper crimper (item #101618) was used to create the ridges/texture on the card stock.
The buttons came from the "Playground" Designer Buttons, item #116313).


Button Latte Designer Button, item #11433, was used for the center of the string art.
Salt Technique used for the background and the crimper used for the texture of the salted paper.
Organza Ribbon, item #114319 was used to accent the card.


This is also done with the Salt Technique (tutorial was shown yesterday here on my blog). I used the Designer Hardware: Basic Jumbo Grommets, item #114348, in the center of the string art.

Hope you enjoyed the overview. The Salt Technique is on my blog ... click HERE to view.

Mary
http://marydirector.stampinup.net/
Stampin' Up! -- Discover Your Creativity
(On-line ordering now available thru my website)

Monday, April 26, 2010

Monday Inspiration - Salt Technique Tutorial

The background on this card was created using the Salt Technique. It is amazing what a little bit of coarse salt and water will do. Also it gave me a great opportunity to do another one of my string art cards, and how could I pass up that opportunity. (hope you are all smiling over that comment -- more photos today and Tuesday and then on to NEW things from the Summer Mini Catalog.)

Stampin' Up Products used:
Bashful Blue Classic Ink Refill, item #105221
Pale Plum Classic Ink Refill, item #101268
Certainly Celery Classic Ink Refill, item #105230
Aqua Painter, item #103954
Heat Tool, item #100005
Glossy White Paper, item #102599, 1 piece 5 1/2 x 4 1/4"
Old Olive 5/8" Satin Ribbon, item #117292 (in the occasions mini catalog)
Pal Plum Card Stock, item #101658, 1 sheet 8 1/2 x 11"
Filagree Designer Brads, item #112577

Non-Stampin' Up! Products used:
Embroidery Thread/Floss
Sea Salt - the type you grind yourself
Fine Mister
Foil, plastic plate or lid for drops of refill


Here everything is laid out and ready to go. The glossy white card stock was cut at 4 1/4" x 5 1/2" ... I trimmed it further down later in the process as I wanted the Pale Plum card base to frame this.


I made a small upraised tray with foil. I put in a few drops of each color making sure to keep them separate. If you need more ink, you can add it when needed.

Mist the glossy white card stock. The water will bead up.

Then dip the aqua painter (it is filled with water also) or a white paint brush into your ink drops, then brush onto the glossy card stock. I brushed on lines, but you can do anything you would like such as swirls, drops of color, areas of one color etc. It is totally up to you.

You may notice that when wet that the glossy paper will curl. Do not be concerned as it dries it will flatten out. If you want it to lay flat while painting, just curl a bit of painter's tape on the back and it will adhere to the paper underneath and stay flat.


This shows some of the curling. You can add more color in at this point if you would like.


Take the coarse salt and grind or sprinkle it all over the painted piece. Then mist again with water. This will cause the paint to bleed a bit and also for the salt to dissolve.

NOTE: If you don't have coarse salt, you can try this with table salt. From what I have read that will work also. Personally I have not tried it.

You can allow the painted/salt image to dry on its own OR you can use a heat tool. If you use a heat tool, put a piece of foil underneath and keep the heat tool moving. Remember this is paper and if overheated could catch fire.

The ones I made the other day I let dry overnight. The one above I used the heat gun. The result were the same.

Once completely dry, brush off the remaining salt using your fingers or a paper towels. Just be gentle, it will come off fairly easy.


I know this picture is unusual, but I wanted to angle the painted/salt paper so that you could see how the salt changed the coloring. It puts a texture and designs on the painted surface.


I trimmed down the painted/salt paper to 3 3/4" x 5".
Wrapped the satin ribbon around the painted/salt paper to resemble a package, then attached one of my string art (done with variegated embroidery thread) pieces. The center of the string art is a Filigree Designer Brad.

If you saw my video yesterday, there were also samples of the salt technique. I will post photos tomorrow of some samples of both the salt technique and string art.

The Stampin' Up! Occasions Mini Catalog ends on Friday. Don't miss out on the products you need and want from this catalog. Contact me directly or order on-line thru my Stampin' Up! website by clicking HERE.

Mary
http://marydirector.stampinup.net/
Stampin' Up! -- Discover Your Creativity
(On-line ordering now available thru my website)

Sunday, April 25, 2010

String Art Video

I've been doing LOTS of string art creations the last few days. So tonight thought it would be fun to do a quick video showing you the items I have made. I promise photos and more details on these items that haven't been featured on my blog the last couple of days. Hope you enjoy the video. If you have problems viewing the video below, you can watch it thru YouTube by clicking HERE.


Mary
http://marydirector.stampinup.net/
Stampin' Up! -- Discover Your Creativity
(On-line ordering now available thru my website)
Thursday, April 22, 2010

String Art - WOW


In yesterday's blog post I showed you a "Thread Art" card I made using regular sewing thread. I really liked it but wanted more dimension to the look. Today I purchased regular embroidery thread/floss, large eyed needles with thin shanks, and a needle threader that handles 3 types of thread. I was thrilled with the results of using the embroidery thread. I did not take apart the strands, use the whole strand. I believe there are 6 threads per strand.

I used Rich Razzleberry and Crushed Curry Card Stock. Then used a lighter version of embroidery thread of each color. I threaded the purple thread first then the curry. I love the result, but if I was going to do it again would put the curry thread in first.

I put brads in the corners. The tiny flowers are made with the NEW (May 1, 2010) Itty Bitty Shapes Paper Punch Pack (item #118309) for the scallop shape and my Crop-A-Dile (item #108362) using the 1/8" circle punch.

I threaded the hat pin with clear teardrops, clear round beads, and white pearls thru the embroidery threads. Attached with a small glue dot to stabilize AND also an end cap on the hat pin. Isn't the hat pin fabulous!!! The Pretties Kit (item #109114) has these accessories plus silk flowers in numerous shapes and styles.

If you decide to make and mail this type of card, be sure to mail it in a padded envelope so that it will go thru the mail with no problem. It will also require extra postage. Wouldn't this be a perfect card for Mother's Day.

Just a reminder: If you LOVE the Crushed Curry, order the card stock, ink, ribbons etc soon as they will be retiring this color as of 1 July 2010.

Mary
http://marydirector.stampinup.net/
Stampin' Up! -- Discover Your Creativity
(On-line ordering now available thru my website)

Wednesday, April 21, 2010

String Art Card


This is my 2nd post today. Here's the card I was working on today. This is actually made with sewing thread and hand sewn. I like the effect and hope you will too. There is a tutorial on Lynn Pratt's blog on how to do the string art. If you want a thicker look to the thread, embroidery floss/thread would be a great choice.

The mat pack (item #105826) was a necessity for the precise marking of the stitching along with the paper-piercing tool (item #11631). Butterflies were made using the Butterfly Paper Punch (item #116629).

Just a reminder that the occasions mini catalog for Stampin' Up! is only valid thru the 30th of this month.

Mary
http://marydirector.stampinup.net/
Stampin' Up! -- Discover Your Creativity
(On-line ordering now available thru my website)

You May Also Like:

Blog Widget by LinkWithin