Subscribe via email

Enter your email address:

Delivered by FeedBurner

Showing posts with label Tutorial - Mini. Show all posts

Wednesday, August 22, 2012

Scented Stampin' Emboss Powder by Stampin' Up!

Stampin' Up! now is offering Scented Stampin' Emboss Poser in five scents.   Emboss delightful scents into stamped images.   Simply stamp the image in the ink color you want, then emboss with a scent to match.   Embossed scent lasts up to 2 weeks.   Container is 1/2 oz and the powder is clear.

Scents Available from Stampin' Up!:
Vanilla scented, item #125590
Melon scented, item #127034
Cherry scented, item #127035
Sugar & Spice scented, item #127829
Peppermint Sticks scented, item #127830

This is how I would do the embossing:
1.  Stamp your stamp in a Versamark pad (item #102283), then in the color pad of your choice, then immediately stamp on your card stock.
2.  Completely cover the stamped image with the Scented Emboss Powder, brush off excess.
3.  Heat with Heat Tool (item #129053) until glossy, then let dry completely.

I really like the Stampin' Up! embossing powders.  I have not used the scented ones because of allergies to scents, but I have heard many great comments about them.   Just remember the scent only lasts up to 2 weeks, so don't make your project too far in advance if you want it to be scented.   Even with the scent gone tho, you will have a beautifully embossed card.


You may order from my Stampin' Up! website 24/7 by CLICKING HERE, then click on Shop Now or by contacting me directly. My e-mail link is at the top of the screen.

Mary Director
Stampin' Up! Senior Supervisor, Independent Demonstrator & Creative Coach
http://marydirector.stampinup.net
Stampin' Up! -- Discover Your Creativity
(On-line ordering now available thru my website)

Friday, January 27, 2012

Tips and Tricks for the New Paper Doily Sizzlits Die

Large Sizzlits Die - Paper Doily, item #125592

Stampin' Up! just posted this information, so I wanted to pass it on to all of you also:

Tips and Tricks for the New Paper Doily Sizzlits Die

January 27, 2012 
 
With the Paper Doily Sizzlits Die (item 125592) you can now create the intricate designs you've grown to love with our Sizzlits Dies, in a new, larger size. Some of you have asked questions about the die and we're here to help answer those questions.

A few tips and tricks:
  • Because of variations in materials, you will most likely need to use a shim (such as piece of card stock) when you send it through the Big Shot. 
  • The detailed intricacy comes with a little added work. The negative pieces will not come out automatically when you cut the die. 
    • It may take a little time to remove all the cut pieces from the die-cut paper. Remove the pieces by poking or punching them out. Carefully, push the pieces through the cut design and remove them from the back. Make sure you work from the front side of the doily (the side that was face-down when it was cut) and push the pieces through; if you try to pull them out from the front or if you push them through from the back side, the doily might tear. To make it easier, gently roll the die-cut paper to pop out some of the larger pieces.
    • Push the pieces out using the Paper-Piercing Tool or the small end of the Simply Scored Stylus. 
    • The front side will look completely cut through, however, the back side may not. This is normal with this die, and if you follow the directions of removing the small pieces you will find that the die has cut through the paper. 
  • Because of the intricate design of this die, small pieces might stick in the foam on the actual die. Clear all small pieces from the die before using it again. This will ensure you get a clean cut every time. Remove the remaining pieces by using your Paper-Piercing Tool, being careful not to tear the foam on the die.
You may order from my Stampin' Up! website 24/7 by CLICKING HERE, then click on Shop Now or by contacting me directly. My e-mail link is at the top of the screen.

Mary Director
Stampin' Up! Senior Supervisor, Independent Demonstrator & Creative Coach
http://marydirector.stampinup.net
Stampin' Up! -- Discover Your Creativity
(On-line ordering now available thru my website)

Thursday, January 26, 2012

Scalloped Circle Felt Flower Pin - Mini Tutorial

 My finished flower.

 If I was making this again, I would have the pin facing the opposite direction.   This way was a bit more awkward for me to pin myself.

Added the flower pin to my shirt.  Pleased with the results.

The other day I showed you a step by step tutorial on how to make a Scalloped Circle Felt Wreath using the Big Shot Die Cutting Machine and the Scallop Circle #2 Die.   I had some of the felt scalloped circles left over so decided to make a flower pin.

Here's what I did:
Cut out two of the large Scallop Circles.
Cut out 12 to 15 of the small Scallop Circles.
Take one of the large Scallop Circles and use it as your base.
a.  Fold the small Scallop Circles one at a time (just like on the wreath) and then hand sew to the base.
b.  Continue doing this until you have full flower.   I did sew each petal a couple of times to the base to make them more secure.
c.  Using a hot glue gun, put glue on the back side of the flower then immediately put the other large Scallop Circle on top lining the scallops up.
d.  Open a safety pin, and glue it to the back.  Allow to dry.

Pin can be used on a blouse, a purse, a headband or even as a gift topper.  1/4 of a yard of felt should be more than enough to make a number of finished flowers.   I used scraps of felt that I had so didn't measure out what I used.   If you use cotton fabric, you will need at least double to triple the amount of flowers.  The felt is much denser than cotton.

You may order from my Stampin' Up! website 24/7 by CLICKING HERE, then click on Shop Now or by contacting me directly. My e-mail link is at the top of the screen.

Mary Director
Stampin' Up! Senior Supervisor, Independent Demonstrator & Creative Coach
http://marydirector.stampinup.net
Stampin' Up! -- Discover Your Creativity
(On-line ordering now available thru my website)

Tuesday, August 9, 2011

Punch Art Presents Birthday Card


I just finished making cards for a card swap that my Stampin' Up! KreatesKards team is doing this month.   We each create a card or card front out of current Stampin' Up! products to send to others on our team that are participating too.

These are my contribution to the swap.   The presents were made using a square paper punch and the triple layer blossom punch.   A true piece of "punch art".   This is a great way to use up scraps of card stock too.

Stampin' Up! products used:
Very Vanilla Card Stock for the base, item #101650

Misc scraps of Card Stock for the presents and ribbon tops
1 3/8" Square Paper Punch, item #119877
Blossom Bouquet Triple Layer Punch, item #122464
Happiest Birthday Wishes (Hostess Rewards)

Mini Tutorial to make the presents:

1.  Using the 1 3/8" Square Paper Punch, punch out the number of presents you need for your project.
2.  Using the Blossom Bouquet Triple Layer Punch, punch out layer 3 and the same number as the boxes.
3.  1/2 of the blossom will be exposure, so only put glue on the 1/3 to 1/2 of the blossom and attach to the back of the square.
4.  Attach the presents to the card

You don't need to do any cutting of the blossoms.   Presents can be created in any color and may be arranged in any pattern or layering pattern.


 You may order from my Stampin' Up! website 24/7 by CLICKING HERE, then click on Shop Now or by contacting me directly. My e-mail link is at the top of the screen.

Mary Director
Stampin' Up! Senior Supervisor, Independent Demonstrator & Creative Coach
http://marydirector.stampinup.net
Stampin' Up! -- Discover Your Creativity
(On-line ordering now available thru my website)

Tuesday, August 2, 2011

Being Creative With Scrap Card Stock - Mini Tutorial + MDS Downloads

I have containers of scrap card stock in my craft area.   I use it here and there, but often forget about it and grab new product rather than using what I can of the pieces already cut up.   I have decided to start using more and more of my scrap pieces ... there is nothing wrong with them, they are great quality Stampin' Up! products and should be used.

One of my passions is making cards for soldiers overseas.   I have a box about 2/3 of the way full and hope to mail it soon.   These cards allow the service men and women to have cards to send home to their families and friends.

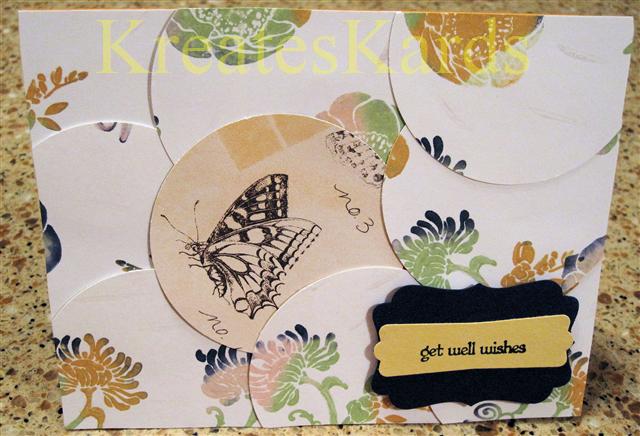
Here's the cards I made yesterday:


Do you seen common elements in these cards?   All were made using the following products:

Stampin' Up! Products Used:
2 1/2" Circle Punch, item #120906
Decorative Label Punch, item #120907
Modern Label Punch, item #119849
Teeny Tiny Wishes Stamp Set, item #115370 - Wood Only

Mini Tutorial:
1.  Using an standard card base, I put adhesive over the complete front of the card base. (Sticky Strip or SNAIL works great ... be generous in application).
2.  Start attaching the 2 1/2" circles in a random order.  They can overlapped the card base.
3.  Any edge that is on the card base, but not secure add a bit of multi-purpose or two way glue underneath the circle area that is not secure.  Both have fine points and can get into smaller areas.
4.  Once all circles are attached and secure, turn the card base over.   It now will be easy to trim off the overhang of circles on the card base.  Just be careful not to cut into the fold of your card base.
5.  Stamp sentiment on card stock (color of your choice), then punch out with Modern Label Punch.
6.  Punch a Decorative Label to accent the Modern Label you just punched out.   Glue Modern Label punched sentiment to the Decorative Label.   Then attach this to your card using Dimensionals.


The latest My Digital Studio Downloads are now available.

You may order from my Stampin' Up! website 24/7 by CLICKING HERE, then click on Shop Now or by contacting me directly. My e-mail link is at the top of the screen.

Mary Director
Stampin' Up! Senior Supervisor, Independent Demonstrator & Creative Coach
http://marydirector.stampinup.net
Stampin' Up! -- Discover Your Creativity
(On-line ordering now available thru my website)

Monday, June 27, 2011

Dyed Rhinestones - Mini Tutorial


Why settle for clear rhinestones when you can dye them yourself using a Sharpie Permanent Marker!!  These will be perfect for adding sparkle to your card or scrapbook page.  Also a great way to create a birthday card with birthstones on it.

Mini Tutorial:
1.  Purchase Jewels-Basic Rhinestones (item #119246).
2.  Decide which color(s) of gemstones you want.
3.  Using the Sharpie, color the top and sides of the rhinestones.  You can leave them on the mat that the rhinestones are adhered to.  If you do this step while the rhinestone is on your card, you take the chance of marking up the card.   Remember that the pearls & rhinestones are self-adhesive, so working with them on the mat makes it much easier to store them on till needed.
4.  Allow to dry.
5.  Use as needed.

The rhinestones come 150 to a package.  There are 50 each of 3 sizes:  5mm, 4mm, and 3mm. 

You can also dye Jewels-Basic Pearls, item # 119247 using the same procedure.


You may order from my Stampin' Up! website 24/7 by CLICKING HERE, then click on Shop Now or by contacting me directly. My e-mail link is at the top of the screen.

Mary Director
Stampin' Up! Senior Supervisor, Independent Demonstrator & Creative Coach
http://marydirector.stampinup.net
Stampin' Up! -- Discover Your Creativity
(On-line ordering now available thru my website)

Saturday, May 21, 2011

Look What You Can Create Using Stampin' Up! Border Paper Punches

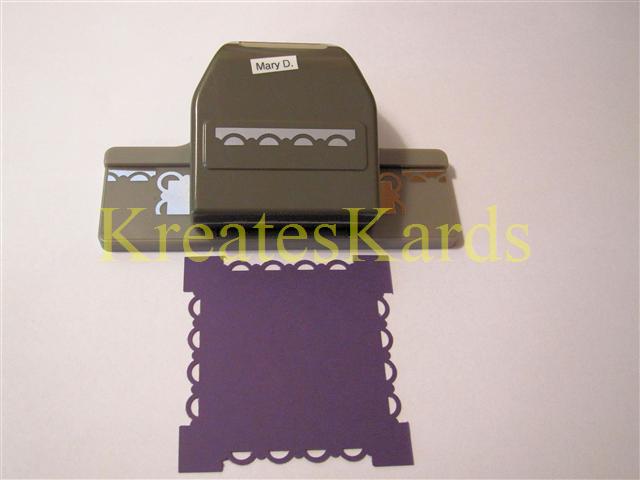
 These are all 5 samples that I made today using the Stampin' Up! Border Punches.   Each square is 3" x 3".  Below I will show you close ups of the design.   The black punches are the old design of punch, the gray are the new design of punch.   Whether old or new, they are GREAT quality punches and will punch the same design.

This is the Scallop Edge Border Punch, item #119882.
 
This is the Eyelet Border Punch, item #119853.

This is the Scallop Trim Border Punch, item #118402.

This is the Pinking Hearts Border Punch, item #117649.

And my final sample is the Dotted Scallop Ribbon Border Punch, item #119275
I cut out 3" squares of card stock.   Then placed the edge centered so that equal amounts of card stock were on each side of the punch lever area ... then punched.   Repeated until all 4 sides were complete.

Here's a sample using the 1 1/4" Striped Grosgrain Ribbon (see Pg 191 main catalog).

You can also put another layer in the center of the 3" square.   These are truly very versatile.   Change the look too with buttons, brads, or other embellishments in the corners.

You may order from my Stampin' Up! website 24/7 by CLICKING HERE, then click on Shop Now or by contacting me directly. My e-mail link is at the top of the screen.

Mary Director
Stampin' Up! Senior Supervisor, Independent Demonstrator & Creative Coach
http://marydirector.stampinup.net
Stampin' Up! -- Discover Your Creativity
(On-line ordering now available thru my website)

Monday, February 21, 2011

Changing the Color of Stampin' Up! Rosettes

Concord Crush, Poppy Parade, Peach Parfait - top row
Vanilla - bottom row

When you order the Vanilla Rosettes, you will receive a package of 18 (6 each of 3 different sizes - 1/2" 3/4", and 1").  The Rosettes are 100% polyester.  Mini glue dots are used to adhere the flowers to your projects. 

To change the color of the rosette, use a Stampin' Write Marker in the color of your choice.  Use the wide tip and start coloring in the petals.   I used a pair of tweezers to rotate the rosette and also to flip it over.   Allow to dry thoroughly before using.   The color will not be an exact match to the marker, but will compliment it beautifully.

Rosette, Vanilla (18), item #116774

You may order from my Stampin' Up! website 24/7 by CLICKING HERE, then click on Shop Now or by contacting me directly. My e-mail link is at the top of the screen.

Mary Director
Stampin' Up! Senior Supervisor, Independent Demonstrator & Creative Coach
http://marydirector.stampinup.net
Stampin' Up! -- Discover Your Creativity
(On-line ordering now available thru my website)

Friday, February 4, 2011

Peek a Boo, I see You - Owl Card, Mini Tutorial

Like many, I have a stamp set or two that I haven't used but have had a while.   One that I had is called Woodgrain, item #117100.   It is a larger single stamp measured approximately 4 1/2" x 6".   I inked it with Early Espresso Classic Ink using a brayer to ensure full coverage.  It was then stamped on Whisper White Card Stock.

I punched out the circle (1 3/4" Circle Punch, item #119850) and adhered the owl to the back of the woodgrain piece of card stock.   The owl was stamped using Crumbcake Classic Ink.

The owl and scallop circle flower are both from the Sale-a-Bration stamp set called Punch Bunch.  It is item #121847 - Wood OR #123211 - Clear Mount.  It cannot be purchased, but can be earned as a FREE PRODUCT during Sale-A-Bration.   With each $50 purchase (before tax & shipping) you will earn one free product from the Sale-A-Bration brochure.

I also accented this card with 5/8" Grosgrain Ribbon, item #119762 - Marina Mist.  There are 13 colors offered in this type of ribbon. 

All products used are from Stampin' Up!

You may order from my Stampin' Up! website 24/7 by CLICKING HERE, then click on Shop Now or by contacting me directly. My e-mail link is at the top of the screen.

Mary Director
Stampin' Up! Senior Supervisor, Independent Demonstrator & Creative Coach
http://marydirector.stampinup.net
Stampin' Up! -- Discover Your Creativity
(On-line ordering now available thru my website)

Monday, January 3, 2011

Sneak Peek: Build a Blossom & Blossom Petals Punch Mini Tutorial

I'm so excited to share with you this Sneak Peak ... it is paper punch and a stamp set that work hand in hand to create some phenomenal designs.  Thank you Stampin' Up! for making these available as of January 4, 2011 in our Stampin' Up! Occasions Mini Catalog.

Build a Blossom Stamp Set, item #121923 - Wood or #121994 - Clear Mount
Blossom Petals Paper Punch, item #121808

I used Blushing Bride Card Stock (item #119796) and Blushing Bride Classic Ink (item #119786) to create this amazing flower.  The lighter color you see in the flower is the card stock, and the deeper color is the classic ink.   I stamped out 5 of the solid images and 5 of the design across a piece of card stock.  Then punched them out using the Blossom Petals Punch.   I then arranged them, layering each petal and then finished it off with the stamped and punched out center.   I used a separate circle punch for the center.

The Blossoms Petals punch has 5 sizes of petals/leaves.  The Build a Blossom stamp set has 12 different stamps in it for different sizes of petals, leaves, and centers.   The centers can be punched out using our 1/2" Circle and 1" Circle paper punches too.

LOVE this coordinating set.  If you could only purchase two items, these are the two that I would recommend.   Extremely versatile.  The results are beautiful.

The sentiment was stamped using the Curly Cute stamp set, item #117014 - Wood OR item #120510 - Clear Mount.   Sentiments include:  Congratulations, Happy Birthday, Seasons Greetings, Thinking of You, and Thank You.

Card base was made with Sahara Sand card stock, item #121043.

You may order from my Stampin' Up! website 24/7 by CLICKING HERE, then click on Shop Now or by contacting me directly. My e-mail link is at the top of the screen.

Mary Director
Stampin' Up! Senior Supervisor, Independent Demonstrator & Creative Coach
http://marydirector.stampinup.net
Stampin' Up! -- Discover Your Creativity
(On-line ordering now available thru my website)

Monday, November 8, 2010

Wild Wasabi & Certainly Celery Card #3 With Mini Tutorial

 This is the 3rd card in the Wild Wasabi & Certainly Celery Series.  This is my personal favorite.  


 Did you notice the white fabric look???  It is actually tissue paper that has been stamped on, crumbled, and then glued to a piece of cardstock.   I think the look is unique and it adds texture to the card also.

Mini Tutorial:
1.  Cut two pieces of Certainly Celery Card Stock ... 1 piece 5 1/2" x 8 1/2" (card base) and 1 piece 3 1/4" x 4 3/4" (tissue paper will be wrapped around this).  You will need a small scrap piece too.

2.  Cut one piece of Wild Wasabi Card Stock ... 3 3/4" x 5".  You will need a small scrap piece too.

3.  Cut a piece of tissue paper approximately 4 1/4" x 5 3/4" (doesn't have to be exact).   Stamp your image on the tissue paper.   Allow a minute or so to dry.  Now crumple the tissue paper up into a small ball, then gently unwrap and flatten (do NOT remove all wrinkles).   Go over the 3 1/4" x 4 3/4" Certainly Celery Card stock with a glue stick, now gently place your tissue paper on top adhering as much as possible.   Fold ends over to back and glue into place.

 4.  Layer the Tissue Paper with card stock to the Wild Wasabi piece of card stock.  Wrap with 2 accent ribbons (each 4 1/2" long).   Now adhere to card base.

5.   Stamp sentiment on Certainly Celery and punch out with Decorative Label Paper Punch.  Punch out one in Wild Wasabi, cut this one in half then adhere to the Certainly Celery one to give an accent.  Using Stampin' Dimensionals, attach to card.

Stampin' Up! Products Used:
Wild Wasabi Card Stock, item #108641
Certainly Celery Card Stock, item #1051125
Peach Parfait 1/2" Stitched-Poly Ribbon, item #119264Peach Parfait Classic Ink, item #119783
Plant Hope Stamp Set, item #117042 - Wood Mount OR #120540 - Clear Mount
Stampin' Dimensionals, item #104430
Anywhere Glue Stick, item #104045
Decorative Label Paper Punch Extra-Large, item #120907

You may order from my Stampin' Up! website 24/7 by CLICKING HERE, then click on Shop Now or by contacting me directly. My e-mail link is at the top of the screen.

Mary Director
Stampin' Up! Senior Supervisor, Independent Demonstrator & Creative Coach
http://marydirector.stampinup.net
Stampin' Up! -- Discover Your Creativity
(On-line ordering now available thru my website)

Saturday, September 18, 2010

Let Them Have Cake - No Calories

Cake with no calories, how can that be????
When it is a cake made from paper, as cute as it can be.

The other day while on Stampin' Connection (Stampin' Up! Demonstrator only website), I saw a beautiful paper cake created by Bridget Douglass. Bridget mentioned where she had obtained the template for the cake slices and I was off to search. The template makes one slice, but when you put 12 slices together it makes an approximate 9" round cake like I made below. It is 2 1/4" high.

Click here for the template. Template is from Victorine Originals
The directions are on the template for making the slice of cake. Just be sure to use a strong double sided tape (like Stampin' Up! Sticky Strip, item #104294) to hold it together.


12 slices of cake put together. The ends open ... this is a box to hold goodies or small presents.

Just testing out different looks ... I had 13 of the carnation & ruffled flowers, so decided to play a bit with them to see what different looks I could achieve.


I fully decorated one piece. The white frosting is our 2 3/8" Scallop Circle Extra-Large, item #118874. It is a perfect fit for the slices.

The Happy Birthday was cut out with 2" x 1 3/8" Oval Extra-Large Punch and layered onto the Decorative Label Extra-Large Punch.

Isn't the striped paper the perfect touch to make it looks like layers of cake and frosting. I used the In-Color Designer Series Paper Pack which is the Level One Hostess Gift, item #121028.

I'm not sure if this is the design I will do for the cake. But it is a great example and I had fun making it. Once I have completely finished the cake decoration, I will post the completed cake.

You could use the cake as a party favor, to hold birthday or anniversary gifts, and wouldn't it be perfect for a bridal shower too. If you are an Home Party Consultant of any type, this would be great to put door prize slips into the boxes for people to draw. Perfect too for the person who wants a cake, but doesn't want the calories. So many possibilities.

Stampin' Up! Card Stock:
Chocolate Chip, item #102128
Whisper White, item #100730
Old Olive, item #100702

Click HERE for Carnation Tutorial
Click HERE for Ruffled Flower Tutorial

If you would like to order any Stampin' Up! products, you may order 24/7 by clicking HERE and then click on shop now. Thank you for visiting my blog today. If you have any questions, please let me know.

Mary Director
http://marydirector.stampinup.net
Stampin' Up! -- Discover Your Creativity
(On-line ordering now available thru my website)

Thursday, August 19, 2010

Altered Spiral Notebook plus Sneak Peek

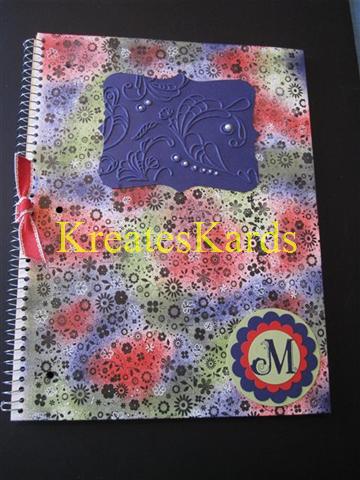
This weekend I came across a great deal on notebooks, so picked up a few. Decided that I was going to learn how to make an altered notebook. I've seen so many beautiful ones, and knew that I could make one too.

This is a standard 8" x 10 3/4" school spiral notebook. It has 70 pages of paper in it, and you can find them at most stores. I gently tore out the first sheet of paper and used it as my template marking all of the holes with a pencil and then punching them out with my Crop-A-Dile. Then you cut into the hole from the side with scissors so that it will slide over and fit the spiral part.

I decorated the new cover AFTER I had attached to the original cover. With the next one, I will decorate the background first then attach. By doing it first, you cover the white edge. I don't think it is really noticeable but I know it is there. I adhered the new and original cover together using sticky strip which gives a great bond. I ran it along the edges and just a bit in the middle too.

All products used were Stampin' Up! with the exception of the notebook.

Colors I used were: Poppy Parade, Concord Crush, and Pear Pizzazz both for the card stock and the classic inks.

Background was created using Basic Black Classic ink on Whisper White card stock. Stampin' Jumbo Wheel used: Petite Petals, item #120322. I used the Background Whimsy Technique and also highlight certain areas of the design using our Uni-Ball Signo Gel Marker, item #105021. It truly is an opaque white that gives great coverage.

Did you notice the Sneak Peek Item???? Look closely at the Monogram ... we have a brand new 2 1/2" Extra Larger Circle Punch, item #120906. It will be $16.95 and will be available as of September first.

Monogram accent piece made with:
2 1/2" Circle Extra-Large Punch, item #120906
2 3/8" Scallop Circle Extra-Large Punch, item #118874
1 3/4" Scallop Circle Extra-Large Punch, item #119854
1 3/8" Circle Large Punch, item #119860
Broadsheet Alphabet Stamp Set, item #118724 - Wood OR #120585 - Clear Mount.

I absolutely LOVE this. I used the Elegant Lines Textured Impressions Embossing Folder, item # 119277. Then I accented it using Stampin' Up! Jewels called Basic Pearls, item #119247.
Aren't they just the perfect fit for this piece. They are "half-back" pearls and there are 150 in the package. 50 each of 3 sizes: 5mm, 3mm, and 2mm. Each has an adhesive back. I, for one, am planning to order a few packages of these and the Basic Rhinestones, item #119246 (pearls or rhinestones package is only $4.95).

I can see this design on a wedding or anniversary card and the pearls give it that extra elegant bling.

I decided that I would like a pocket on the inside of the notebook. So basically did the same thing as the cover, except for only 1/3 of the page. Used the Scallop Edge Border punch, item #119882, to accent it. Attached on 3 sides using Sticky Strip.

Wouldn't this make a great teacher gift or gift for a co-worker? I'm planning to make a number of them as gifts this year.

Stampin' Up! has the best quality products and such a wide range of products too. If you have any questions, please let me know (e-mail link at top of this page). If you would like to place an order, you may order 24/7 at my Stampin' Up! website by clicking HERE then click on shop now or by contacting me directly.

Mary
http://marydirector.stampinup.net
Stampin' Up! -- Discover Your Creativity
(On-line ordering now available thru my website)

Friday, August 13, 2010

Friday the 13th - Good Luck Ladybugs Mini Tutorial

Since it is Friday the 13th, I thought it was appropriate to send everyone a bit of good luck and wishes for a wonderful day.

Aren't these little ladybugs the cutest ever! You won't believe how easy they are to make too. Did you notice the new Decorative Label Punch (item #120907 - available 1 Sep) in black and layered underneath our Designer Label Punch, item #119862. Using the Uni-Ball Signo Gel Pen, item #105021, I printed the Good Luck.

The ladybugs are made with just circles and the antennas are hand drawn in using a Stampin' Write Marker.

Mini Tutorial:

1. Punch out the head of the ladybug with a small circle punch using Basic Black Card Stock. Using SNAIL adhesive attach to your card.

2. Punch 2 larger circles for the body and the wings. Basic Black Card Stock for body, Real Red for the wings.

3. Glue body over edge of the head circle.

4. Cut wing circle in half, then position over the body leaving a bit of an opening.

5. Using a round eraser head (like on the end of the pencil), dip the eraser into Classic Black ink then daub on the ladybug's wings. Makes perfect spots for them.

6. Using a Stampin' Write Marker in Basic Black, draw in the antennas.

Punches Used:

Large Ladybug:
1 3/4" Circle, item #119850
1 " Circle, item #119868

Medium Ladybug:
1 3/8" Circle, item #119863
3/4" Circle, item #119873

Small Ladybug:
1 1/4" Circle, item #119861
1/2" Circle, item #119869

The embossed backdrop was made using Manhattan Flower Textured Impressions Embossing Folder, item #114517. This folder is an exclusive design to Stampin' Up! and perfect for use with our little ladybugs.

Mary
http://marydirector.stampinup.net
Stampin' Up! -- Discover Your Creativity
(On-line ordering now available thru my website)

Wednesday, August 4, 2010

Gum Holder Mini Tutorial

Today I made a mini gum holder that would be perfect for a stocking stuffer, to keep in your purse, store on your desk, or to give as a small thank you gift to someone. The idea for this is from Dawn Griffith.

I want to show you the photos first, then will post a mini tutorial for you on how to make this. The first photo above is of the cover.


You will use a slider type pack of gum and cut it in half which will give you 6 pieces of gum for this holder. In this photo the gum has been placed in the slot created using the Word Window Punch.


This photo shows the gum holder. Finished size is: 3" x 3" x 3/8"

Stampin' Up! Supplies Used:
Just Believe Stamp Set, item #116948 - wood OR item #120453 - clear mount
Pumpkin Pie Card Stock, item #105117
Whisper White Card Stock, item #100730
Pumpkin Pie Classic Ink, item #105216
Stampin' Sponges (3 to a pack), item #101610
Sticky Strip, item #104294
SNAIL Adhesive, item #104332 (SNAIL Refill, item #104331)
Bone Folder, item #102300
2 3/8" Scallop Circle Extra-Large Paper Punch, item #118874
1 3/4" Scallop Circle Extra-Large Paper Punch, item #119854
1 3/8" Circle Large, item #119860

Directions:

1. Cut piece of Pumpkin Pie Card Stock 3 1/4" x 9 5/8". Then score it at 3", 3 3/8", 6 3/8", and 6 3/4". Using the Bone Folder, crisply fold each score line. The 3" section is your gum holder top piece.

2. Attach sticky strip to the inside end of the bottom piece. Do not remove the adhesive yet. Using the word window punch, you will create the slot for the gum by punching it twice (actually will be equal to approximately 1 1/2 word windows in width. Be sure the paper is as far in as possible in the punch; punch; slide over; punch again. Be sure to leave an edge on each side. Now remove adhesive and bring the piece up into the holder to create the pocket. Keep the 3/8" edge as straight as possible so that it forms a box like bottom.

3. Punch out the 2 3/8" Scallop Circle in Whisper White Card Stock. Using a sponge section, sponge Pumpkin Pie Classic Ink around the edges.

4. Punch out the 1 3/4 Scallop Circle in Pumpkin Pie Card Stock.

5. Stamp the circle floral image from the stamp set, then punch out using the 1 3/8" Circle Punch. The punch is slightly larger than the stamped image, so will leave a white area around it.

6. Using SNAIL adhesive layer the 2 scallop pieces and the circle piece. Now attach to the gum holder front using SNAIL adhesive.

7. Gently slide in the 6 pieces of gum into the slot, and you are now ready to use this as a gift.

You could also do a belly band for this holder or add in a small circle of velco if you wanted to keep the cover totally flat.

If you need any of the Stampin' Up! products to make this item, please order on-line thru my Stampin' Up! website by CLICKING HERE the click shop now OR by contacting me directly.

If you haven't tried Stampin' Up! products before, I know you will LOVE their quality and the variety that is offered.

Mary
http://marydirector.stampinup.net
Stampin' Up! -- Discover Your Creativity
(On-line ordering now available thru my website)

Wednesday, July 7, 2010

Flamingo Made Using Two Step Bird Punch - Mini Tutorial

First, I would like to thank Ellen Kemper for her wonderfully creative idea of making a flamingo using the Two-Step Bird Punch. After seeing her photo, I had to make one myself. How could I not, I have a friend in New York (Lin) who is in desperate need of Flamingoes. Beside I wanted to know myself how this was done.

The photo above is the flamingo I made this afternoon using Concord Crush Card Stock as the background and Blushing Bride Card Stock for the Flamingo. I used the Stampin' Write Markers in Basic Black and Blushing Bride to accents the pieces and to add the eye of the flamingo in.

Mini Tutorial:

Punch out 3 sets of birds using the Two-Step Bird Punch.

Trim the outer sides leaves off the branches. 2 will become the legs, 1 will be the neck.

Trim off the beak using Paper Snips (Scissors). This will be the body of the Flamingo. The other two bodies are not used.

Using the Blushing Bride Stampin' Write Marker, accent one of the wings.
Using the Basic Black Stampin' Write Marker, fill in one of the wings to transform it as the beak.

Using two-way glue (it has a fine tip which really helps when working with the narrow pieces) adhere the legs to the card base.
Then adhere the neck, don't leave too much space as the body will go over this.

Using two-way glue, adhere the body then the accented wing piece.
Next glue on the head, then the beak.

Put in the flamingo's eye using the Stampin' Write Marker in Basic Black.

You can leave the card plain or add in a sentiment. Easy to do, and so cute!!!

Supply list:
Tow-Step Bird Extra-Large paper punch, item #117191
Paper Snips, item #103579 --- these are the BEST scissors ever
2-Way Glue Pen, item #100425
Stampin' Write Marker, Basic Black, item #100082
Stampin' Write Marker, Blushing Bride, sold in a set of all In-Colors, item #119801
Concord Crush 8 1/2 x 11 card stock, item #119792
Blushing Bride 8 1/2 x 11 card stock, item #119796

Hope you enjoyed the mini tutorial today and that you will try making a flamingo too.

If you need any Stampin' Up! products, please let me know (e-mail link is above) OR you can order on-line 24/7 thru my Stampin' Up! website by clicking here then click on Shop Now.

Mary
http://marydirector.stampinup.net
Stampin' Up! -- Discover Your Creativity
(On-line ordering now available thru my website)

Friday, June 18, 2010

Sneak Peek - Impression Folder Mini Tutorial

One Big Shot product that is always a major hit with my customers are the Textured Impression Embossing Folders. The one pictured above is a Sneak Peek of the one called Vintage Wallpaper, item #120175. I love the deep impressions this folder makes. Wait till you see the next photo and how I was able to transform it. I used Bashful Blue Card Stock, item #105120. There is a 2nd one that I don't have yet, called Elegant Lines - item #119277. Can't wait to get that one too.


Doesn't this look like Wedgewood? Amazing what you can do just by adding a bit of ink. It is amazing how the pattern stands out even more.

NOTE: What appears to be white above is actually the Bashful Blue paper. The blue tone is a direct result of the Marina Mist Classic Ink being applied to the impressions folder.

Here's a quick mini tutorial for you:

1. Cut a piece of Bashful Blue Card Stock 5 1/2 x 4 1/2, set aside.
2. Ink a brayer using Marina Mist Classic Ink, item #119668. Remember to roll only in one direction on the ink pad. That way the complete brayer will be inked.
3. Roll the inked brayer over the "depressed" inside of the impressions folder.
4. Place the card stock over the inked side, and close folder.
5. Place the folder in the Big Shot and crank thru using the proper "sandwich".
6. Gently remove the paper and set aside to dry.
7. Rinse off the brayer and impressions folder. I ran mine under cold water. You can spray too with Stampin' Mist if needed. Pat dry, then allow to air dry before putting away.

I think this will make an amazing background for a card, don't you?

The Sneak Peek items will not be available until July 1st. You may order Stampin' Up! products by contacting me directly or by placing an order thru my on-line store. CLICK HERE.

Mary
http://marydirector.stampinup.net
Stampin' Up! -- Discover Your Creativity
(On-line ordering now available thru my website)

Monday, June 14, 2010

Monday Inspiration: Baby Wipe Background Technique Mini Tutorial

This beautiful background is made using glossy white paper, a folded baby wipe, and 3 colors of Stampin' Up! In Refills.

Added in stamped images, ribbon, and a sentiment tag. Doesn't it make a great card. I'm so pleased with the results. This is my first time using this technique. It was easy to do.

Mini Tutorial:
1. Score your card base at 5 1/2". Fold with bone folder and set aside.

2. Cut a piece of glossy white paper (item #102599) 3 3/4" x 5"

3. Fold the baby wipe a couple of times, put drops of ink on the folded edge. I used 3 colors and put them in sequence from left to right (Bashful Blue- item #105221; Pretty in Pink - item #102295; and Certainly Celery - item #105230). Wipe across the paper. You may need to move down and wipe again to cover the complete piece of paper. Allow to dry.

(NOTE: You will get ink on your fingers. I always work with plastic and paper towels under my glossy paper too just in case of spills, leaks, or excess moisture).

Basic Black, Classic Ink .. item #101179 was used for the stamped things in the following steps:

4. I used 2 step stamping for the tree/ground and the wolf. The stamp set I used is called Nature Silhouettes, item #111542. Two Step Stamping Technique Tutorial can be seen HERE. Stamp the tree image first, then the wolf.

5. Attach the 5 1/2" piece of Old Olive 5/8" Satin Ribbon, item #117292.
(Use Sticky Strip, item #104294).

6. Stamp the sentiment on the piece of Dusty Durango Card Stock (1 1/4" x 3"), item #115321. Use the Tag Corner Paper Punch, item #107215 on all 4 corners. Put 4 dimensionals, item #104430 on the tag and center on the ribbon.

7. Using Sticky Strip, item #104294 attach your background piece to your card base.

Card is now complete.

The baby wipe technique is a great way to create sunsets, sunrises, and beautiful color combinations. I hope you will try this technique to see what you can create.

It is easy to order 24/7 for any Stampin' Products you might need. CLICK HERE and then click on Shop Now to place your order.

Mary
http://marydirector.stampinup.net
Stampin' Up! -- Discover Your Creativity
(On-line ordering now available thru my website)

Friday, March 26, 2010

Circles, Squares, Ribbon & Sentiment Mini Tutorial

A while back I discovered a blog called 365 Cards. Each day they post a challenge and ask people to participate. It really is a great way to get your creative thoughts going. I had a bit of insomnia this morning, so decided to take the challenge. They did ask for a 5 x 5 card. Since I didn't have a 5 x 5 envelope to match, I did change the card size. The challenge was to use 3 circles, 2 squares, ribbon and sentiment.

Stampin' Up! Products Used:
Taken With Teal Classic Ink: item #103257
Whisper White Card Stock, item #100730
Pumpkin Pie 1/4" Grosgrain Ribbon, item #109030 (2 pieces 4" each)
1 3/4" Circle Paper Punch: item #112004
1 3/8" Square Paper Punch: item #103375
Welcome Neighbor Designer Series Paper, item #118401 (only available until 3/31/2010)
Whimsical Words Stamp Set, item #118386 - wood mount OR #119119 - clear mount (only avaible until 3/31/2010)
Well Scripted, item #117072 - wood mount OR item #118601 - clear mount (only available until April 30, 2010.

Directions:
1. Create your card base.
2. Punch out 3 circles and 2 squares
3. Attach circles using SNAIL adhesive.
4. Tie ribbons on the two squares.
5. Using Dimensionals, attach squares to the card
6. Stamp sentiment using Taken With Teal
7. Sign the back of your card

Wasn't that quick and easy. Hope you will try this challenge too.

Just a reminder that Sale-a-bration is ending in 5 days. Don't miss out on this great opportunity to receive a free gift with each $50 purchase (before tax & shipping). Here's a link to the Sale-A-Bration catalog which is in PDF format: Click HERE.

You may contact me directly to place your order or order 24/7 thru my Stampin' Up! website.


Mary
http://marydirector.stampinup.net/

Stampin' Up! -- Discover Your Creativity
(On-line ordering now available thru my website)

Thursday, March 18, 2010

Clouds in the Sky - Technique Tutorial Mini

For quite a while now I have seen deigns made where the clouds in the sky were done using a scallop circle. I always thought it was interesting and had wanted to try it.

The photo above is of the finished design. I like the shading in the sky, but it is acutally only done with one color. Interesting how it changes the look of intensity of the color with this technique.

Instead of using a scallop circle, I used our new Extra Large Fancy Flower Paper Punch, item #118073 in the Occasion Mini Catalog.

1. Punch out 1 of the Extra Large Fancy Flowers
2. Place it on the card base (I used whisper white for the card base).
3. Using a small sponge, lightly sponge Bashful Blue Classic Ink (item #105209) over the top part of the flower onto the card base.
4. Move the flower over and repeat. Keep doing this step until your sky is complete.
It is OK to go over areas that you have sponged before, just change the position of the flower. It really gives it a neat affect that looks like clouds.
5. Then I used Garden Green Classic Ink and sponge on the ground cover (no designs, just the sponge).

The stamp set I used for this card is called Good Neighbors, item #118378 for wood mount OR item #119116 for clear mount. This is a Sale-a-bration stamp set that is available as one of your free choices if you have a $50 minimum order (before tax & shipping). The stamp set has 3 different houses, 3 different roofs, 3 different trees, and the cloud design. It was fun to use.

If you need a Stampin' Up! Demonstrator, I am just an e-mail away. You can also order directly thru my Stampin' Up! on-line store

I did get my Flip Ultra HD video today. I think I have some work ahead of me to learn how to use it properly. Will post a video soon. I have decided that at the point I am doing video tutorials that I also will at least post a mini-tutorial if not a full tutorial. There was quite a bit of mixed feelings about videos verus photo tutorials. Since I don't want to lose any of my loyal followers, doing a bit of both will help everyone. Thank you all so much for being such loyal fans.

A quick reminder too that I have a Facebook page for KreatesKards also. It is a great way to join in on discussions, post your creations, and let us know what you are doing too. Here's the link. I consider it an extension of my blog here ... they work well together.

Mary
http://marydirector.stampinup.net/
Stampin' Up! -- Discover Your Creativity
(On-line ordering now available thru my website)

You May Also Like:

Blog Widget by LinkWithin