Subscribe via email

Enter your email address:

Delivered by FeedBurner

Tuesday, January 31, 2012

My Digital Studio Downloads - January 31, 2012

The latest My Digital Studio digital designs have just been released.   They can be viewed on-line by clicking HERE.

You may order from my Stampin' Up! website 24/7 by CLICKING HERE, then click on Shop Now or by contacting me directly. My e-mail link is at the top of the screen.

Mary Director
Stampin' Up! Senior Supervisor, Independent Demonstrator & Creative Coach
http://marydirector.stampinup.net
Stampin' Up! -- Discover Your Creativity
(On-line ordering now available thru my website)

Scallop Circle Fabric Ball - Great Gift Idea

 I've been having bursts of creativity the last two weeks going outside the box of creating more cards.   So far I've showcased my felt wreath, pin, melting crayon art, and now fabric balls.  I'm falling behind a bit on my card making ... LOL.  More cards on the way, I promise.    Sometimes when you get super motivated about a project, no matter what you have to create it.   Know you all understand.

 Start with a 4 inch Styrofoam ball and 3 packages of Stampin' Up! Fabric.  Each package has 3 fat quarters in it.   You will use between 8 to 9 fat quarters to complete this project.  The fabric shown here is called:  Designer Fabric - Twitterpated, item #125412.  Fabric was cut into 3" x 3" pieces.

Using your Big Shot Die Cutting Machine, cut out small scallop circles from the BigZ die called: Scallop Circle #2.   Because I was using cotton fabric that is much thinner than felt, I was able to cut out 8 layers of material at a time.  Made the project of cutting go so much quicker.

I took about 12" of ribbon, folded it in half.   The top 6 inches (3 inches on each side of the loop) is the handle and the remaining 3 inches on each side is attached to the ball.   Secure with a few straight pins.  Now as scallops are added, they will help secure it even more.


 The headed straight pin is placed in the very center of the scallop circle.


Fold the fabric up and around the top of the pin.


Now place the pin with fabric close to the other piece for a dense and full look.  Continue until you have filled in the whole ball.  


Here's the completed one above using Twitterpated Designer Fabric.

 This one was created using Timeless Portrait Designer Fabric, item #122337 from the main catalog.  It is black, white, with touches of red in it.

Products Used for this project:
One 4" Styrofoam Ball
Size 17 - 1 1/16 Ball Point Pins (they have a head on them) - I purchased 2 packs of 300.
Big Shot Die Cutting Machine, item #113439
Scallop Circles #2 BigZ Die, item #113469
Timeless Portrait Designer Fabric, item #122337
Twitterpated Designer Fabric, item #125412

Stampin' Up! Fabric listed above is 100% cotton.  Each pack comes with 3 assorted designs in it.  Each piece of fabric is approximately 27" x 18".   Each piece gives you 54 scallops if cut at 3" x 3" and a package would give you 162 scallops.   The completed ball is densely filled in will take approximately 486 scallop circles - this number is an approximate and will vary by individual.  It totally depends on how densely the ball is filled in.   I highly recommend buying 3 packages (9 pieces total of fabric) so there is NO chance of running out of fabric (trust me, I know this from personal experience ... LOL).  One suggestion is to cut out 2 of the 3 packages.   Then the last package cut when you have finished using the other two completely.   In my opinion you are going to need at least half of that last package.  Because of that you could cut the fat quarters in 1/2 so if you don't need it all you still have solid pieces left inside of 3" x 3" squares.

You may order from my Stampin' Up! website 24/7 by CLICKING HERE, then click on Shop Now or by contacting me directly. My e-mail link is at the top of the screen.

Mary Director
Stampin' Up! Senior Supervisor, Independent Demonstrator & Creative Coach
http://marydirector.stampinup.net
Stampin' Up! -- Discover Your Creativity
(On-line ordering now available thru my website)

Monday, January 30, 2012

Melted Stampin' Up! Watercolor Crayon Video Tutorial

The other day I posted a step by step photo tutorial of how to create an art canvas by melting crayons.   That tutorial can be found HERE.   These canvases make an amazing gift.  

The photo above is my finished product and a list of the supplies I used to create it:


Stampin' Up! Products:
1/2" Stitched-Poly Ribbon, item #119267 - Blushing Bride OR item #119266 - Concord Crush
Jewels, Large Pearl Basic Jewels, item #125577
Heat Tool/Gun, item #100005
Framelits Die, Labels Collection, item #125598
Apothecary Art Stamp Set, item #125525 - Wood OR item #125527 - Clear Mount
Loving Thoughts Stamp Set, item #125843 - Wood OR item #125845 - Clear Mount
Watercolor Pencils, item #101879

My video is a two part video.   Both are shown below on my blog.  If you are reading this via e-mail, you will need to come to my blog to view the videos on-line.

Part 1:


Part 2:


Important Notes:
1.  Remember that the crayon is wrapped in paper.  Paper can catch fire, so be extremely careful.
2.  The wax in the crayons as it melts will splatter, so be sure to protect your work area.
3.  Wax is extremely HOT, do not touch the art piece until it has completely cooled.
4.   Open your doors and windows if you do this.  Crayons have a strong odor when melting.
5.  Do not hang on a wall that has direct sunlight.  It "may" cause your art work to melt even more.
6.  This project is not recommended for children.

Disclaimer:  If you do this technique, you are doing so at your own risk.   I'm not reasonable for any accidents etc that might happen while doing this technique.


You may order from my Stampin' Up! website 24/7 by CLICKING HERE, then click on Shop Now or by contacting me directly. My e-mail link is at the top of the screen.

Mary Director
Stampin' Up! Senior Supervisor, Independent Demonstrator & Creative Coach
http://marydirector.stampinup.net
Stampin' Up! -- Discover Your Creativity
(On-line ordering now available thru my website)

Friday, January 27, 2012

Tips and Tricks for the New Paper Doily Sizzlits Die

Large Sizzlits Die - Paper Doily, item #125592

Stampin' Up! just posted this information, so I wanted to pass it on to all of you also:

Tips and Tricks for the New Paper Doily Sizzlits Die

January 27, 2012 
 
With the Paper Doily Sizzlits Die (item 125592) you can now create the intricate designs you've grown to love with our Sizzlits Dies, in a new, larger size. Some of you have asked questions about the die and we're here to help answer those questions.

A few tips and tricks:
  • Because of variations in materials, you will most likely need to use a shim (such as piece of card stock) when you send it through the Big Shot. 
  • The detailed intricacy comes with a little added work. The negative pieces will not come out automatically when you cut the die. 
    • It may take a little time to remove all the cut pieces from the die-cut paper. Remove the pieces by poking or punching them out. Carefully, push the pieces through the cut design and remove them from the back. Make sure you work from the front side of the doily (the side that was face-down when it was cut) and push the pieces through; if you try to pull them out from the front or if you push them through from the back side, the doily might tear. To make it easier, gently roll the die-cut paper to pop out some of the larger pieces.
    • Push the pieces out using the Paper-Piercing Tool or the small end of the Simply Scored Stylus. 
    • The front side will look completely cut through, however, the back side may not. This is normal with this die, and if you follow the directions of removing the small pieces you will find that the die has cut through the paper. 
  • Because of the intricate design of this die, small pieces might stick in the foam on the actual die. Clear all small pieces from the die before using it again. This will ensure you get a clean cut every time. Remove the remaining pieces by using your Paper-Piercing Tool, being careful not to tear the foam on the die.
You may order from my Stampin' Up! website 24/7 by CLICKING HERE, then click on Shop Now or by contacting me directly. My e-mail link is at the top of the screen.

Mary Director
Stampin' Up! Senior Supervisor, Independent Demonstrator & Creative Coach
http://marydirector.stampinup.net
Stampin' Up! -- Discover Your Creativity
(On-line ordering now available thru my website)

Melted Crayon Tutorial Using a Stampin' Up! Heat Gun

This is a photo intensive tutorial.  If you are receiving it by e-mail, you may need to view it at my blog especially if you do not have high speed internet.   

Oh my gosh, melted crayon art work is the gift to give right now.  You will see many examples of it throughout the internet.  However, there are not too many tutorials and all that I have found use a hairdryer.  Well, I have a wonderful Stampin' Up! Heat Gun which I couldn't wait to try.  It worked extremely well both with crayons and with Stampin' Up! Watercolor Crayons.   I will post the video tutorial for the Watercolor Crayons on Monday here on my blog.  Today is a photo tutorial I created using regular crayons and the heat gun.

Important Notes:
1.  Remember that the crayon is wrapped in paper.  Paper can catch fire, so be extremely careful.
2.  The wax in the crayons as it melts will splatter, so be sure to protect your work area.
3.  Wax is extremely HOT, do not touch the art piece until it has completely cooled.
4.   Open your doors and windows if you do this.  Crayons have a strong odor when melting.
5.  Do not hang on a wall that has direct sunlight.  It "may" cause your art work to melt even more.
6.  This project is not recommended for children.

Disclaimer:  If you do this technique, you are doing so at your own risk.   I'm not reasonable for any accidents etc that might happen while doing this technique.  

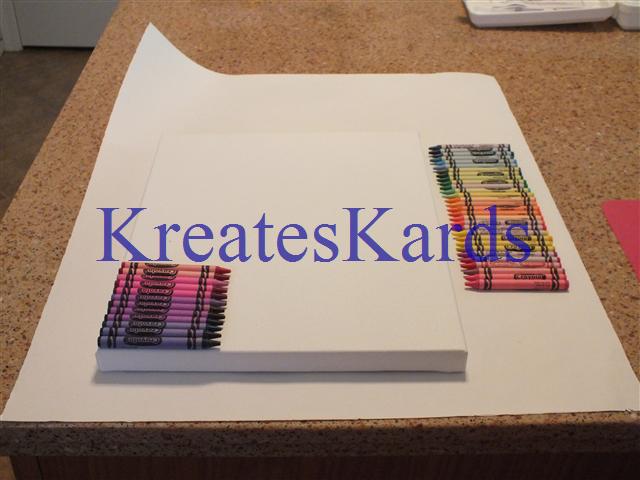
First sort you the colors (right side of photo).  My canvas was 11" x 14".   I used a box of 64 crayons and removed black, browns, grays and white before sorting.

 Using a hot glue gun, I put glue on the backs of the crayon (held with a pari of tweezers) and then immediately put it on the board with the crayon name up (so you can see it).  All crayons were put on the same way.

 Once all the crayons were in place and glue dry, I braced the canvas at an angle.  Be sure it will not slip.   Remember that the wax will splatter.  I covered part of my island with butcher paper then foil on top.   Wasn't sure if hot wax would soak thru the butcher paper, so decided foil on top was a good idea.

 Stampin' Up! sells a great heat gun.  It is easy to use, heats up immediately, and is pretty lightweight.

I started on the left and moved the heat gun back and forth, trying not to keep it in one position any length of time.  Again, remember the paper wrappers on the crayons are flammable ... be careful.  

 With crayons, they start to melt quickly and will drip down the canvas.   Because there is forced air from the heat gun, some of the drips will follow the path of the air.


 Having fun watching it melt as I go along.   

There will be some texture and some blobs of color.  You can run the heat gun over them to remelt if you want the color further down on the canvas.

 Melting process done.

 Added in Stampin' Up! 1/2" Stitched-Poly Ribbon across the front of the crayons AND
 around the sides (see photo below)

 Here's my finished project using crayons.

I used the same technique for Stampin' Up! Watercolor Crayons.  I used the colors I had on hand that were discontinued/retired a couple of years ago.  

The watercolor crayons melt differently than regular crayons.   They blended more together too which was neat.  We also noticed that they had a great deal of 3D effect with the melted wax.

 I added in a stamped image, a framelits frame, ribbon, and pearls.  
NOTE:  Do not put pearls on the wax.  They do not stick long term.   The ones I placed on the front of the crayon wrappers are fine tho.  I used watercolor pencils to color in the stamped image.

A close-up the pearls, ribbon, watercolor crayons, and melting.

Stampin' Up! Products:
1/2" Stitched-Poly Ribbon, item #119267 - Blushing Bride OR item #119266 - Concord Crush
Jewels, Large Pearl Basic Jewels, item #125577
Heat Tool/Gun, item #100005
Framelits Die, Labels Collection, item #125598
Apothecary Art Stamp Set, item #125525 - Wood OR item #125527 - Clear Mount
Loving Thoughts Stamp Set, item #125843 - Wood OR item #125845 - Clear Mount
Watercolor Pencils, item #101879

Come back on Monday to view my two part video tutorial on this same subject.


Disclaimer:  If you do this technique, you are doing so at your own risk.   I'm not reasonable for any accidents etc that might happen while doing this technique.  
You may order from my Stampin' Up! website 24/7 by CLICKING HERE, then click on Shop Now or by contacting me directly. My e-mail link is at the top of the screen.

Mary Director
Stampin' Up! Senior Supervisor, Independent Demonstrator & Creative Coach
http://marydirector.stampinup.net
Stampin' Up! -- Discover Your Creativity
(On-line ordering now available thru my website)

Thursday, January 26, 2012

Scalloped Circle Felt Flower Pin - Mini Tutorial

 My finished flower.

 If I was making this again, I would have the pin facing the opposite direction.   This way was a bit more awkward for me to pin myself.

Added the flower pin to my shirt.  Pleased with the results.

The other day I showed you a step by step tutorial on how to make a Scalloped Circle Felt Wreath using the Big Shot Die Cutting Machine and the Scallop Circle #2 Die.   I had some of the felt scalloped circles left over so decided to make a flower pin.

Here's what I did:
Cut out two of the large Scallop Circles.
Cut out 12 to 15 of the small Scallop Circles.
Take one of the large Scallop Circles and use it as your base.
a.  Fold the small Scallop Circles one at a time (just like on the wreath) and then hand sew to the base.
b.  Continue doing this until you have full flower.   I did sew each petal a couple of times to the base to make them more secure.
c.  Using a hot glue gun, put glue on the back side of the flower then immediately put the other large Scallop Circle on top lining the scallops up.
d.  Open a safety pin, and glue it to the back.  Allow to dry.

Pin can be used on a blouse, a purse, a headband or even as a gift topper.  1/4 of a yard of felt should be more than enough to make a number of finished flowers.   I used scraps of felt that I had so didn't measure out what I used.   If you use cotton fabric, you will need at least double to triple the amount of flowers.  The felt is much denser than cotton.

You may order from my Stampin' Up! website 24/7 by CLICKING HERE, then click on Shop Now or by contacting me directly. My e-mail link is at the top of the screen.

Mary Director
Stampin' Up! Senior Supervisor, Independent Demonstrator & Creative Coach
http://marydirector.stampinup.net
Stampin' Up! -- Discover Your Creativity
(On-line ordering now available thru my website)

Wednesday, January 25, 2012

Video Tutorial: How to use Stampin' Up! Framelits

I just finished a video on how to use our new Stampin' Up! Framelits for the Big Shot Die Cutting Machine.   They are so easy to use and will expand what you can do with your Big Shot.   They have been a major hit with my customers and team members.

If you are reading my blog via e-mail, you will need to come to the blog to view the new video.   Here's the video for those that are reading on-line:


Framelits Dies for the Big Shot:
Hearts Collection, item #125599
Labels Collection, item #125598
Big Shot Die Cutting Machine, item #113439

You may order from my Stampin' Up! website 24/7 by CLICKING HERE, then click on Shop Now or by contacting me directly. My e-mail link is at the top of the screen.

Mary Director
Stampin' Up! Senior Supervisor, Independent Demonstrator & Creative Coach
http://marydirector.stampinup.net
Stampin' Up! -- Discover Your Creativity
(On-line ordering now available thru my website)

Tuesday, January 24, 2012

Important Update Note About Sale-A-Bration Hostess Benefits


See notes below in RED ... I didn't realize until today that to qualify for the tote and/or bundle that I had to place the order for you instead of you placing your order yourself on-line.

For every $50 of Stampin' Up! product purchased before tax and shipping you will receive one free item from the Sale-A-Bration Brochure!!!!  There is NO limit on the amount of product you can earn at no cost to you.

Remember too that during Sale-A-Bration (January 24th through March 31, 2012) if you have a minimum $150 order before tax and shipping, you qualify for hostess benefits too.   With a $150 minimum order, you will earn $25 in Hostess Dollars, a FREE tote (exclusive during Sale-A-Bration), and three Sale-a-Bration items of your choice.  If you have a minimum of $400 order before tax and shipping, you will earn $65 in Hostess Dollars, 1 item of your choice at 1/2 price, the FREE Tote AND Hostess Bundle (see Page 3 of the Sale-A-Bration brochure for details) PLUS  8 items from the Sale-a-Bration brochure of your choice.
  *Free shopping tote with workshop, customer and demonstrator orders only; offer does not include online orders. Free hostess bundle with workshop, customer, or demonstrator orders; offer does not include online orders. Offers are not incremental (i.e., a hostess does not receive two totes for a $300 workshop or two bundles for an $800 workshop). Contact me directly to put the order in for you to qualify for the free tote and bundle.

You can view the Sale-A-Bration Brochure by clicking HERE
Place an Order by CLICKING HERE, then click on Shop Now.

You may order from my Stampin' Up! website 24/7 by CLICKING HERE, then click on Shop Now or by contacting me directly. My e-mail link is at the top of the screen.

Mary Director
Stampin' Up! Senior Supervisor, Independent Demonstrator & Creative Coach
http://marydirector.stampinup.net
Stampin' Up! -- Discover Your Creativity
(On-line ordering now available thru my website)

My Digital Studio Downloads - January 24, 2012


The latest My Digital Studio Downloads are now available HERE.


You may order from my Stampin' Up! website 24/7 by CLICKING HERE, then click on Shop Now or by contacting me directly. My e-mail link is at the top of the screen.

Mary Director
Stampin' Up! Senior Supervisor, Independent Demonstrator & Creative Coach
http://marydirector.stampinup.net
Stampin' Up! -- Discover Your Creativity
(On-line ordering now available thru my website)

Apothecary Art Card Using Framelits - Sale-A-Bration starts TODAY!!!

Sale-A-Bration starts TODAY!!!!  For every $50 of Stampin' Up! product purchased before tax and shipping you will receive one free item from the Sale-A-Bration Brochure!!!!  There is NO limit on the amount of product you can earn at no cost to you.

Remember too that during Sale-A-Bration (January 24th through March 31, 2012) if you have a minimum $150 order before tax and shipping, you qualify for hostess benefits too.   With a $150 minimum order, you will earn $25 in Hostess Dollars, a FREE tote (exclusive during Sale-A-Bration), and three Sale-a-Bration items of your choice.  If you have a minimum of $400 order before tax and shipping, you will earn $65 in Hostess Dollars, 1 item of your choice at 1/2 price, the FREE Tote AND Hostess Bundle (see Page 3 of the Sale-A-Bration brochure for details) PLUS  8 items from the Sale-a-Bration brochure of your choice.
  *Free shopping tote with workshop, customer and demonstrator orders only; offer does not include online orders. Free hostess bundle with workshop, customer, or demonstrator orders; offer does not include online orders. Offers are not incremental (i.e., a hostess does not receive two totes for a $300 workshop or two bundles for an $800 workshop). Contact me directly to put the order in for you to qualify for the free tote and bundle.

You can view the Sale-A-Bration Brochure by clicking HERE
Place an Order by CLICKING HERE, then click on Shop Now.

Are  you thinking of becoming a Stampin' Up! Demonstrator?  Would you like to become part of my team?  Stampin' Up! allows business demonstrators (those that are in to make money) and hobby demonstrators (those that join to get our discount on Stampin' Up! products).    The starter kit is normally $175, but during Sale-A-Bration it is only $125.   The kit value is over a $340 value of product and business supplies.  PLUS during Sale-A-Bration, anyone that joins as a demonstrator will receive a free paper pack or digital download every month for the rest of the year!!!!  You get your choice each month of which you would like to receive.  Let me know if you are interested (e-mail link at top of page) and I will e-mail you additional information with complete details.


If you look very closely you will see a larger label shadowing the floral label.  I sponged this on the card base plus sponged the edges of the card.   Doesn't show up as distinctly as I had hoped, but it is a very nice contrast and adds to the look of the card.

The last two days I have realized just how much I LOVE the in-color "pool party".  It works for cards for a baby, a man or a woman by not being too light or dark.   I've made 5 cards using it, and am very pleased with the results.

Stampin' Up! Products Used:
Apothecary Art Stamp Set, item #125525 - Wood OR #125527 - Clear
Framelits - Label Collection, item #125598
Fleurettes II, item #115604
Rose Red Stampin Write Marker, item #100063 (to accent the Fleurette flower)
Pool Party Classic Ink, item #122938
Pool Party Card Stock, item #122924
3/8" Ruffled Ribbon - Pool Party, item #122975
Watercolor Pencils, item #101879
Everyday Enchantment Ribbon & Brad Pack, item#127279 (Sale-A-Bration item)
     Sale-A-Bration items available 1/24/2012 thru 3/31/2012 only


The Fleurette is white.  I used the Stampin' Write Marker to accent the fleurette with Rose Red.  The flowers of the stamped image were colored in using Stampin' Up! Watercolor Pencils.   The pencils can be used just like a regular color pencil, or you can use a Aqua Painter or Blender Pen to give them the watercolor effect.   Remember if you are creating the watercolor effect, you will want to be sure to use a waterproof ink:


Stampin' Up! Waterproof Inks:
StazOn - Jet Black Ink Pad, item #101406
     Use Staz-On Cleaner to clean stamps, item #109196
Basic Black Classic Ink, item #101179
Basic Gray Classic Ink, item #109120
     Use Stampin' Mist Stamp Cleaner for classic inks, item #102394 & refill item #101022.

You may order from my Stampin' Up! website 24/7 by CLICKING HERE, then click on Shop Now or by contacting me directly. My e-mail link is at the top of the screen.

Mary Director
Stampin' Up! Senior Supervisor, Independent Demonstrator & Creative Coach
http://marydirector.stampinup.net
Stampin' Up! -- Discover Your Creativity
(On-line ordering now available thru my website)

Sunday, January 22, 2012

Scalloped Circle Valentine Wreath Tutorial

I was blog surfing yesterday and came across a great heart wreath made by Wendybell .  Her wreath was my inspiration for my circle wreath.   We both used the Scallop Circles #2 Die (item #113463).  The difference is that she used the large scallop circle and I used the small.

Here's my finished wreath.  I accented it with Stampin' Up! ribbon and framelits die cut hearts.

Materials Needed for this project:
2 yards polyester felt 72" wide *
10 inch Styrofoam circle
450+ straight pins with heads --- Size 17 that were 1 1/16" (you can use different size, this worked well for me.
1  12 x 12 sheet of your favorite Stampin' Up! Designer Series Paper
Scallop Circle #2 Die (I used the smaller circle)
Framelits Dies - Hearts Collection, item #125599
Big Shot Die Cutting Machine, item #113439
5/8" Organza Ribbon, item #114319
Magnetic Sheets, item #119816

*Note:  Felt comes in different varieties such a polyester and also a wool blend.  If you are making this for a gift, do NOT purchase wool felt unless you are sure the person is not allergic to it.   Wool felt costs almost double the amount of polyester felt and honestly I didn't see a great difference in the two styles.   I'm actually allergic to wool, so was glad I had noticed the signs telling of the different types.

Directions:

 This is showing you how the scallops will look on the 10" circle as you start to attach them.


 A closeup photo.


 Let's start by cutting squares.   I used 3 x 3" squares.  Cut 300 squares for 3/4 of the circle to be covered (open space in the back) or 450 squares to completely cover the styrofoam circle front and back.  Because I was using the Big Shot to cut the scallops, I was able to cut 3 to 4 layers at a time instead of just one!!!   Really saved on time.


 Always wonderful to have someone to help cut.
(Thank you Hal, you are the BEST!)

As I cut the scallops out using my Big Shot Die Cutting Machine, I put them in a plastic container.

 Fold the scallop circle in half.

 Fold in half again (making it a quarter)


 Put a headed straight pin thru all 4 layers in the bottom corner.


 Attach to Styrofoam wreath.  Press pin in firmly.  The closer they are to each other, the fuller the wreath.
Stampin' Up!'s magnetic sheet (scrap of it) was great for holding my pins.
 Part way thru the process.   I made sure scallops went down to the table as I made this.  At this point I hadn't decided if I would fill in the back of the wreath or not.


 This shows the back side of the wreath.  I did go back and filled in 100% of the wreath on the front and the back.  


 I think it looks like tiny roses or carnations.  It is really dense.  So pleased with it.


 Before I finished the back, I took a loop of ribbon and attached with straight pins to the back.  Then built the scallops around it securing the loop even more.  You could also hot glue gun the ribbon, but then would be able to attach more scallops over the ribbon area.


 Items need to be multi-purpose.   You could use it as a wreath or as a base for a flower vase.


I cut out all 6 framelits, layered them with SNAIL adhesive then attached to a ribbon I had gone over the wreath with.  

Just a reminder that you can view a larger photo of those above, just by clicking on the photo.

Hope you enjoyed my tutorial today.   You can choose any color felt that you would like, and make this very versatile by switching out the center hearts for other holiday designs.  Also you could do this type of project with card stock or other fabric.   Be creative, try different ideas.

You may order from my Stampin' Up! website 24/7 by CLICKING HERE, then click on Shop Now or by contacting me directly. My e-mail link is at the top of the screen.

Mary Director
Stampin' Up! Senior Supervisor, Independent Demonstrator & Creative Coach
http://marydirector.stampinup.net
Stampin' Up! -- Discover Your Creativity
(On-line ordering now available thru my website)

Stampin' Up! Catalog Changes & Items to be Discontinued

The Stampin' Up! Leadership Conference just ended on Friday in San Antonio TX.  During the conference many new things were announced including a major change to our catalogs.   I'm really pleased with the change and feel it will benefit us all.


Overview of the catalog changes:
"In a nutshell, starting June 1, 2012, Stampin' Up! will release one annual catalog, comparable to (but smaller than) the current Idea Book & Catalog, and two seasonal catalogs, comparable to (but larger than) the current mini catalogs." 

The current Idea Book and Catalog 2011-2012 will expire at the end of May instead of the end of June as originally planned.  

  • The Occasions, Summer, and Holiday Mini Catalogs will be replaced by two seasonal catalogs called the Holiday Catalog and the Spring Catalog.
    • The first Holiday Catalog will run from August 1, 2012 through the beginning of January, 2013
    • The first Spring Catalog will run from the beginning of January, 2013  through May 31, 2013.
  • The seasonal catalogs will be larger in both size (8 1/2" x 11") and page count (about 40 pages) than the current mini catalogs.

Items that will be discontinued as of June 1st, 2012:
Décor Elements and Simply Adorned

There may be other retirements/items discontinued (which is normal at the end of a catalog time frame), and these will be announced later in the year.   Decor Elements and Simply Adorned is being announced now as they are complete product lines not individual product that is being discontinued.  This way if you love the line, you can still pick up items before they are no longer carried by Stampin' Up!.
 
You may order from my Stampin' Up! website 24/7 by CLICKING HERE, then click on Shop Now or by contacting me directly. My e-mail link is at the top of the screen.

Mary Director
Stampin' Up! Senior Supervisor, Independent Demonstrator & Creative Coach
http://marydirector.stampinup.net
Stampin' Up! -- Discover Your Creativity
(On-line ordering now available thru my website)

You May Also Like:

Blog Widget by LinkWithin