Subscribe via email

Enter your email address:

Delivered by FeedBurner

Wednesday, March 31, 2010

Build-a-Brad - Product Review

I had heard quite a bit about the Stampin' Up! Build-A-Brad kit, but had never tried it myself. So with my last order, I order one of the kits. It is pictured above. It comes in a cute little tin with a see thru top. You will find it on Pg 179 of the main catalog.

Build-a-Brad choice of 2 kits, each $9.95
Item #109108 Antique Brass
Item #109128 Pewter (this is the set I used)

Punch a 1/2" circle of Designer Series Paper or stamp a custom image to build your own brad! Kit includes 24 each brad bases and adhesive acrylic bubbles.


Here is the kit opened up. It has a plastic insert so that the bases and the bubbles can be kept separate in the tin. I placed one of the bases on top of the bubbles so you could see it a bit better.


I stamped a larger image, then punched it out with 1/2" circle paper punch (item #104390). Use a small glue dot or adhesive to put the 1/2" circle in the base. Then carefully take the bubble and set it on top. Press firmly to secure.

What a great way to make a custom brad. I was really pleased with the outcome and think they are a perfect addition to this card. I would recommend this product and hope that you will try them too.

Here's my finished card. I created my own Designer Series Paper by stamping images on white card stock for the base. All stamped images used in this card are from the Vintage Vogue Stamp Set, item #117690 - wood mount OR item #118598 for clear mount. I also used the In Colors of Melon Mambo and Rich Razzleberry.

Today, Wednesday - March 31, is the absolute last day for the Sale-A-Bration promotion. You may order on-line or by contacting me directly. Orders HAVE TO BE PLACED and SUBMITTED no later than 11:50 PM Mountain time today to be accepted.

Mary
http://marydirector.stampinup.net/
Stampin' Up! -- Discover Your Creativity
(On-line ordering now available thru my website)

Tuesday, March 30, 2010

Switching Gears - Let's Talk About VW Beetles

Beetle Bailey in Sunny Arizona
2010 Salsa Red New Beetle

Thought I would have a little bit of fun today and show you a video of the "Final New Beetle Edition for 2010". Hal took our little bug (Beetle Bailey) into the dealer early yesterday and came home talking non-stop about this limited edition Beetle that had just been put on the lot to sell. He was so excited about it that we drove all the way back to the dealer just so he could show it to me. I took my FLIP UltraHD camcorder with me so that I could share with all of you.

As a result, I didn't get any crafting done but we had a wonderful time. Our salesman, Curt Kemper at Chapman VW in Scottsdale, was so nice to show us the car etc so I could make a video to show even tho he knew we couldn't buy.

Hope you enjoy the video. We love our Beetle even if not one of the final editions ones. Are any of you VW Beetle fans?


Mary
http://marydirector.stampinup.net/
Stampin' Up! -- Discover Your Creativity
(On-line ordering now available thru my website)

Monday, March 29, 2010

Big Shot Petal Card Box Video Tutorial

Welcome to Monday Inspiration. Thought it would be fun to show you how to make this box today.

Yesterday I posted some additional photos of this box and some general information. I just did a video tutorial on how to make this box. All of the specifics (item #s etc) can be found on yesterday's post ... just click HERE.

Here's the video, hope you enjoy it. I absolutely LOVE the Big Shot.
(NOTE: You may need to turn the volume up just a bit.)


Mary
http://marydirector.stampinup.net/
Stampin' Up! -- Discover Your Creativity
(On-line ordering now available thru my website)

Sunday, March 28, 2010

Big Shot Petal Card Box


Someone mentioned that they had made a box using the Petal Card Die for the Big Shot. I had to figure out how it was made, so I set to work. Turns out it wasn't too difficult and I am very pleased with the result.

Stampin' Up! products used:
Big Shot Die Cut Machine, item #113439
Petal Card BigZ Die, item #113467
Flower, Daisies #2 BigZ Die, item #114520
Standard Premium Crease Pad, item #113476 (recommended for the BigZ dies with folds)
SNAIL Adhesive, item #104332
Pop-Up Glue Dots, item #103683
1/2" Circle Paper Punch, item #104390
Whisper White Organza 5/8" ribbon, item #114319
1 piece 12x12" card stock of your choice for the petal card -- cut into four 6 x 6" pieces
2 pieces 6 x 6" card stock for the flowers

The 4 petal cards were cut out, then lined up side by side to make the box. I glued them together by attaching the petals. The bottom is folded just like the card would of been. I used the small circle punch for the top and tied with a ribbon. The daisies were attached with the Pop-Up Glue Dots to the box ... the layers of the daisies was done with SNAIL to layer them and keep them together.

Thought this would be a great gift box idea, a small Easter Basket, or a candy box. Lots of possibilities and could be personalized easily using stamps, flowers, brads, and other embellishments.

I really use my Big Shot Die Cut Machine a great deal. It's fun to be creative with it and to think outside the box with what can be done with the dies. I have shown a card on my blog earlier that used the Petal Die, CLICK HERE to view. It's the 2nd photo.

UPDATE: Just put a video tutorial on my blog that shows how this box is made. CLICK HERE to view the tutorial.

Mary
http://marydirector.stampinup.net/
Stampin' Up! -- Discover Your Creativity
(On-line ordering now available thru my website)

Saturday, March 27, 2010

Ribbon Layering Technique Tutorial

Today I thought it would be fun to show you a new technique called Ribbon Layering. It is so easy to do, plus it will extend the uses for your ribbon stash as it creates many different patterns and looks when you do this.

First you will need two pieces of ribbon ... any length, but make sure they are equal in length and one ribbon needs to be wider than the other.

I used these ribbons from Stampin' Up!
Whisper White Organza Ribbon - 5/8" wide, item #114319
Rose Red 1/4" Grosgrain Ribbon - 1/4" wide, item #111366


Now you are ready to adhere the two pieces together. You could use sticky tape (if it is narrow enough), but I used SNAIL adhesive and was very pleased with the results. Here's informaton on the Stampin' Up! SNAIL adhesive:

SNAIL ADHESIVE, item #104332
SNAIL ADHESIVE REFILL, item #104331
Did you know that our SNAIL adhesive is a permanent adhesive that is acid free. There are 472" of adhesive in each one. It is great that you can buy refills for it too as many companies do not sell the refill for their adhesive. Stampin' Up! is doing its part to recycle.

Put the SNAIL on the back of the smaller piece of ribbon. Then starting at one end gently center and layer across the wider piece. Then press firmly to adhere.


This is the completed piece (above).


Now I have added it to a piece of card stock to dress it up a bit. Think of all the new looks you will be able to create with this simple technique. Remember you don't need to wrap the ribbon all the way around. Make the ribbon just about 1 inch longer than the area you are covering, then fold over the ribbons ends and tape to the back of the paper. Then attach the paper to your card. See card below to see how it is attached.

Here's the card I created using the layering technique for the ribbon. My scallop ovals do cover it up a bit, but I like the addition of the color and the organza ribbon to dress it up a bit too. I'm doing this card in response to challenge at 365 Cards Blog.

Stampin' Up! Products Used (in addition to those listed above):
Butterfly Paper Punch, item #116629
Scallop Oval Paper Punch, item #114889
Sincere Salutations Stamp Set, item #115068
Welcome Neighbor Designer Series Paper, item #118401 (Sale-a-bration product, only available thru the end of March ... this is one of the FREE choices).

This card could be made with many different designs of paper, colors of ribbon, sentiments .. the ideas would have be limitless.

Hope you will try this technique, and let me know what you think of it. If you have any questions, please let me know. If you would like to order Stampin' Up! products from me, please contact me directly OR order them thru my official Stampin' Up! website where you can order 24/7.

Mary
http://marydirector.stampinup.net/
Stampin' Up! -- Discover Your Creativity
(On-line ordering now available thru my website)

Friday, March 26, 2010

Circles, Squares, Ribbon & Sentiment Mini Tutorial

A while back I discovered a blog called 365 Cards. Each day they post a challenge and ask people to participate. It really is a great way to get your creative thoughts going. I had a bit of insomnia this morning, so decided to take the challenge. They did ask for a 5 x 5 card. Since I didn't have a 5 x 5 envelope to match, I did change the card size. The challenge was to use 3 circles, 2 squares, ribbon and sentiment.

Stampin' Up! Products Used:
Taken With Teal Classic Ink: item #103257
Whisper White Card Stock, item #100730
Pumpkin Pie 1/4" Grosgrain Ribbon, item #109030 (2 pieces 4" each)
1 3/4" Circle Paper Punch: item #112004
1 3/8" Square Paper Punch: item #103375
Welcome Neighbor Designer Series Paper, item #118401 (only available until 3/31/2010)
Whimsical Words Stamp Set, item #118386 - wood mount OR #119119 - clear mount (only avaible until 3/31/2010)
Well Scripted, item #117072 - wood mount OR item #118601 - clear mount (only available until April 30, 2010.

Directions:
1. Create your card base.
2. Punch out 3 circles and 2 squares
3. Attach circles using SNAIL adhesive.
4. Tie ribbons on the two squares.
5. Using Dimensionals, attach squares to the card
6. Stamp sentiment using Taken With Teal
7. Sign the back of your card

Wasn't that quick and easy. Hope you will try this challenge too.

Just a reminder that Sale-a-bration is ending in 5 days. Don't miss out on this great opportunity to receive a free gift with each $50 purchase (before tax & shipping). Here's a link to the Sale-A-Bration catalog which is in PDF format: Click HERE.

You may contact me directly to place your order or order 24/7 thru my Stampin' Up! website.


Mary
http://marydirector.stampinup.net/

Stampin' Up! -- Discover Your Creativity
(On-line ordering now available thru my website)

Wednesday, March 24, 2010

Classy Brass Templates Product Review


I just recently purchased one of the Classy Brass Templates from Stampin' Up!. As a Stampin' Up! Demonstrator it is important that I be familiar with our products and how they are used. Since it was a learning opportunity for me, I thought it would be fun to also do a video to show you more about the product too.

The Templates are actually brass and can be found on page 188 of the 2009-2010 Idea Book & Catalog (our main catalog). We offer six of them and each offers exclusive designs that coordinate with popular Stampin' Up! sets as well as many of them have paper piercing guides too.

Here's an overview of them:

Pick a Petal, item #109542
....Coordinates with Picka a Petal Stamp Set on Page 120.

Punches Plus (the one reviewed here), item #109539
... Coordinates with punches on Page 186

Priceless, item #109541
... Coordinates with Priceless Stamp Set on Page 130

Floral Frenzy, item #111807
... Coordinates with Eastern Blooms Stamp Set on Page 108

Seeing Spots, item #107412

Dots, item #109540

Here's my video, hope you enjoy it:


I think the templates will be great for cards, scrapbooking pages, and other paper crafting projects. They are well made and range in price from $9.95 to $21.95. You can also use an Empressor Stylus (item #100716) or a Stylus (item #100663) to emboss the images also. I did not have the opportunity to do the embossing since I had not purchased the stylus yet. I did order it today, so will try that feature at a later time.

I would be happy to help you with any questions or if you would like to place an order. You may contact me directly OR order thru my on-line store for Stampin' Up! by clicking HERE.

Mary
http://marydirector.stampinup.net/
Stampin' Up! -- Discover Your Creativity
(On-line ordering now available thru my website)

Monday, March 22, 2010

Vintage Vogue Stamp Set

This accidentally was posted this evening instead of tomorrow morning. Be sure to scroll down so that you see both posts as there are now TWO for today instead of one today and one tomorrow.


I have had the Vintage Vogue Stamp set for quite a while now, but haven't shown it on my blog. Tonight I was being creative with a birthday card for a friend and wanted to use the Faux Quilt technique but also accent it differently than the other cards I have done previously.

Card base is Whisper White.
Handsome Hunter was used for the green layer.
Pretty in Pink was used for the pink layer.
The Big Shot Top Note die image was made with 1 1/4" squares from scraps of paper I had.

Vintage Vogue is one of Shelli's Signature Collection Stamp sets and can be found in the currently in the Occasions Mini Catalog. Item #117690 for the wood mount and Item #118598 for the clear mount stamp set. Each is a set of 8 stamps.

I stamped the larger flower with Rose Red Classic Ink and the smaller flower with Pretty in Pink Classic Ink. I then layered them and put them together with a brad. By attaching them together with a brad and then putting a dimensional in the center back, it allows the flowers to be upraised from the card. This gives them dimensions.

This is a close up to show how they are upraised from the card.

Just a reminder that the Sale-a-bration promotion ends in 8 days. Don't miss out on your chance to receive FREE merchandise. Contact me if you have any questions or need help placing an order. You may also order on-line thru my official Stampin' Up! website.

Mary
http://marydirector.stampinup.net/
Stampin' Up! -- Discover Your Creativity
(On-line ordering now available thru my website)

Monday Inspiration - Think Spring

Amazing that Spring is here and yet so many are still having to worry about snow. The inspiration for today is "Think Spring". Then create a card or a scrapbook page that makes you think of Spring.

My card uses the two-step into Spring approach from Stampin' Up!. The stamp set is Awash With Flowers which will be available as of April 1st. The card base is Whisper White, and I used Handsome Hunter and Certainly Celery for the greens. The deepest pink is Melon Mambo outlined in Rich Razzleberry and the lighter is Pretty in Pink outlined in Real Red. Stems were stamped with Handsome Hunter as was the sentiment and edging of the card base and scallop oval.

Flowers always make me think of Spring, so I thought it would be a good card to show as the inspiration card for today. I hope many of you will participate in the Monday Inspirations and post comments below with links to your work too.

Here's the information also on the Awash with Flowers Stamp set (available April 1st, 2010):
#117062 ... Awash with Flowers (set of 18) Wood Mount ... $39.95
#120549 ... Awash with Flowers (set of 18) Clear Mount ... $27.95

Mary
http://marydirector.stampinup.net/
Stampin' Up! -- Discover Your Creativity
(On-line ordering now available thru my website)

Sunday, March 21, 2010

Memory Keeper / Board Tutorial from Stampin' Up!

Stampin' Up! shares many tutorials with customers and demonstrators. If you go to my Stampin' Up! website, you can see many of the projects with photos and supply lists. CLICK HERE

Above is a beautiful projects from Stampin' Up! called a Memory Keeper, Memory Board, or French Memory Board. It will hold numerous photos, mementos, or cards. It looks fairly easy to do too. I thought it would be a great project to pass on to you.

Here's the items you need and the instructions on how to make it:

Accessories

  • Soft Suede polka dot grosgrain ribbon, item #115612
  • Linen thread
  • 5/8" Jumbo brads, item #112533
  • Sizzix Big Shot, item #113439
  • Lattice Bigz die, item #115958
  • Beautiful Butterflies Bigz die, item #114507
  • 18" x 18" artist canvas
  • Background fabric (2/3 yard)
  • Push pins
  • Thumbtacks

Instructions
  1. Adhere background fabric to canvas.
  2. Die cut lattice shapes from fabric using Big Shot and Lattice Bigz die. Adhere to fabric in rows.
  3. Adhere Soft Suede polka dot grosgrain ribbon to fabric in crisscross pattern. Attach 5/8" Jumbo brads where ribbon intersects. Adhere Soft Suede polka dot grosgrain ribbon around outside edges of canvas.
  4. Die cut six large and six small butterflies using Big Shot and Beautiful Butterflies Bigz die. Create double-sided butterflies by adhering butterflies together, resulting in three large and three small double-sided butterflies. Tie linen thread around the middle leaving two long ends for antennae. Attach butterflies to canvas using push pins.
Tip: I picked up this tip from Lisa Richter. She recommends getting a products called Heat-N-Bond to adhere the lattice to the fabric. It is found in the fabric department and is a product you iron on.

I haven't made this yet, but would love to make one. It would be perfect for displaying my cards.

Mary
http://marydirector.stampinup.net/
Stampin' Up! -- Discover Your Creativity
(On-line ordering now available thru my website)

Saturday, March 20, 2010

Carnation Ruffled Flowers Video Tutorial

A few weeks ago, I posted a Ruffled Flower Tutorial to my blog. At my classes that I taught last month I mentioned that you could also use almost the same technique to make beautiful carnations. Today I created a video tutorial showing you how to make the carnations. Hope you enjoy it, please leave a comment too. I'm new at making the videos and appreciate the feedback on them.


This technique is also a great way to make faux suede for your creations.

Mary
http://marydirector.stampinup.net/
Stampin' Up! -- Discover Your Creativity
(On-line ordering now available thru my website)

Friday, March 19, 2010

Extra Large Two-Step Bird Punch Product Review

Thought it was time to do another product review for you. Today I will tell you about the Extra Large Two-Step Bird Punch that is in the Stampin' Up! Occasions Mini Catalog dated Jan 5 thru April 30, 2010. You will find it on Page 11 of this catalog.

Extra Large Two-Step Bird Punch, item #117191 ... $15.95

This is a photo of the back side of the punch. It has a locking mechanism (the lever towards the bottom of the punch) to allow it to have less room needed for storage.


The front of the paper punch shows the design and even has the design printed on one end for easy viewing when stored on end rather than flat.

The actual punch itself measures: 2 3/4" wide, 5" high, and 1 1/4" depth when closed. The bird measures approximately 2" from its beak to the end of its tail. Branch is just under 2 1/2".


This photo shows the designs being punched out: a bird, a wing, and a branch with leaves.

Many people are using small strips of paper so that each piece is a different color. This is a great way to conserve on paper too especially if you only need one bird or branch. I have seen the wing punched image being used to make tulips and rose buds, then using the branch for the flower stem. Really so very versatile. In the photo below, I used the wing as leaves too.

I had to make one more card using the Faux Quilt Technique. I added the birds, branches, and leaves in using the Extra Large Two-Step Bird Punch. I accented the birds and sentiment using a sponge dauber and bashful blue classic ink. The sentiment says: "happiness always" and is one of the Sale-a-bration stamp set choices, item #118386 - Wood Mount and #119119 - Clear Mount.

LOVE this paper punch and plan to use it a great deal. It is definitely versatile and usable for many occasions. Hope you find these product reviews helpful.

If you have any questions or would like to place an order, please do not hesitate to contact me directly. I am a Stampin' Up! Demonstrator and am always looking for new customers and individuals who would like to be part of my team. Orders may be placed 24/7 thru my Stampin' Up! website, by clicking HERE.

Mary
http://marydirector.stampinup.net/
Stampin' Up! -- Discover Your Creativity
(On-line ordering now available thru my website)

Thursday, March 18, 2010

My Very First Video

My very first video ... just a test, want to be sure it can be uploaded to my blog. Let me know what you think. It gives you a mini-tour of my craft room.


Mary
http://marydirector.stampinup.net/
Stampin' Up! -- Discover Your Creativity
(On-line ordering now available thru my website)

Clouds in the Sky - Technique Tutorial Mini

For quite a while now I have seen deigns made where the clouds in the sky were done using a scallop circle. I always thought it was interesting and had wanted to try it.

The photo above is of the finished design. I like the shading in the sky, but it is acutally only done with one color. Interesting how it changes the look of intensity of the color with this technique.

Instead of using a scallop circle, I used our new Extra Large Fancy Flower Paper Punch, item #118073 in the Occasion Mini Catalog.

1. Punch out 1 of the Extra Large Fancy Flowers
2. Place it on the card base (I used whisper white for the card base).
3. Using a small sponge, lightly sponge Bashful Blue Classic Ink (item #105209) over the top part of the flower onto the card base.
4. Move the flower over and repeat. Keep doing this step until your sky is complete.
It is OK to go over areas that you have sponged before, just change the position of the flower. It really gives it a neat affect that looks like clouds.
5. Then I used Garden Green Classic Ink and sponge on the ground cover (no designs, just the sponge).

The stamp set I used for this card is called Good Neighbors, item #118378 for wood mount OR item #119116 for clear mount. This is a Sale-a-bration stamp set that is available as one of your free choices if you have a $50 minimum order (before tax & shipping). The stamp set has 3 different houses, 3 different roofs, 3 different trees, and the cloud design. It was fun to use.

If you need a Stampin' Up! Demonstrator, I am just an e-mail away. You can also order directly thru my Stampin' Up! on-line store

I did get my Flip Ultra HD video today. I think I have some work ahead of me to learn how to use it properly. Will post a video soon. I have decided that at the point I am doing video tutorials that I also will at least post a mini-tutorial if not a full tutorial. There was quite a bit of mixed feelings about videos verus photo tutorials. Since I don't want to lose any of my loyal followers, doing a bit of both will help everyone. Thank you all so much for being such loyal fans.

A quick reminder too that I have a Facebook page for KreatesKards also. It is a great way to join in on discussions, post your creations, and let us know what you are doing too. Here's the link. I consider it an extension of my blog here ... they work well together.

Mary
http://marydirector.stampinup.net/
Stampin' Up! -- Discover Your Creativity
(On-line ordering now available thru my website)

Tuesday, March 16, 2010

Having Fun With Faux Quilt Technique

The other day I posted a mini-tutorial for the Faux Quilt Technique. I am having so much fun with it, that I had to post some more of my creations. It really is a great way to use up paper scraps plus created a very unique look with each piece you do.

For each sample, I just used scrap paper square (Stampin' Up! 1 1/4" paper punch, item #104400) and attached them to a 6" square piece of whisper white card stock (but any color will work).

I haven't attached this to a card yet, but do like the look. This was cut using the Stampin' Up! Big Shot Die Cut Machine (item #113439) and the Scallop Circle Die (item #113468).


This was created using the Big Shot "Frame, Oval Scallop", item #114521. When you use this die, you get the frame as well as the oval used below in the Easter card. It makes it very versatile.

Also used from Stampin' Up!:
Stampin' Up! Beautiful Wings Embosslits Die, item #118138 (embossed butterflies)
Messages for Mom Stamp Set, item #117016 - wood OR item #118580 - clear mount
Scallop Trim Border punch, item #118402, Sale-a-bration item


The oval egg is the inside of the Frame, Oval Scallop die used in the 2nd card. The background was created using the Crinkle Background Technique that I posted last week. I used 3 shades of blue classic ink, but you could use any color combination you want.

Also used the following Stampin' Up! products:

Chocolate Bunny Stamp, item #116980 (this is single stamp only)
Eggcoutrements stamp set, item #115164 - wood OR item #118556 - clear mount.

Have any of you tried the Faux Quilt Technique? It is really easy to do, and the results are amazing. I hope that you will try it and then post links to your creations too.

If you would like additional informaton on Stampin' Up! products, please contact me. I am an Independent Demonstrator for Stampin' Up!.

Mary
http://marydirector.stampinup.net/
Stampin' Up! -- Discover Your Creativity
(On-line ordering now available thru my website)

Monday, March 15, 2010

Monday Inspiration - St Patrick's Day Card


Well it is almost St Patrick's Day. Have you had a chance to create a card yet?

Monday Inspiration for today is to create a St Patrick's Day card. Did you realize you can make a quick and easy one just by stamping or punching out 4 hearts to make a shamrock? That is just what I did for the card pictured above.

Here's the mini tutorial for the card:

(All products are Stampin' Up! with the exception of the glitter glue)
1. Create your card base (Very Vanilla - 1 piece 5 1/2" x 8 1/2"), fold in half.
2. Punch out 4 heart shapes using Full Heart Punch and Certainly Celery Card Stock.
3. Accent the edges of the 4 hearts using a sponge and Handsome Hunter Classic Ink.
4. Using SNAIL Adhesive, attach your hearts to the card front to create a shamrock.
5. Using Handsome Hunter Stampin' Marker, draw a stem.
6. I highlighted the center of the shamrock with Green Glitter Glue.
7. Sentiment is Go Green single stamp set. Stamp it directly on the card using Handsome Hunter Classic Ink.
8. Be sure to sign the back.

Wasn't that quick and easy!!! Hope you each will make a St Patrick's Day card this week too. Send the Luck of the Irish to your friends and family. It will bring them a smile for sure.

If you need any Stampin' Up! products, please contact me or order thru my on-line Stampin' Up! Store by clicking HERE. I have been a Stampin' Up! Demonstrator now for over 1 1/2 years. I love the quality of the products and the variety and know you will too.

Mary
http://marydirector.stampinup.net/
Stampin' Up! -- Discover Your Creativity
(On-line ordering now available thru my website)

Sunday, March 14, 2010

Need input from you, please.


Hi Everyone,

Today I am asking your opinion on tutorials. Up until now, all of my tutorials have been step by step photo ones. I'm seriously considering switching my format to video. If I do video, I will also post a photo of the finished product with a supply list.

So what I would like to know is which do you prefer:
Video
Step by Step photos
Doesn't matter - I use both

Please post your comments below. I appreciate you taking the time to do this for me.

The card shown above was made using "rub-ons" . The set I used is on Pg 176 of the main catalog and is called Dots & Designs, item #115728. You can also learn more about it on my blog entry HERE.

Mary
http://marydirector.stampinup.net/
Stampin' Up! -- Discover Your Creativity
(On-line ordering now available thru my website)

Saturday, March 13, 2010

Sweet Scoops - Sneak Peak

We had a team meeting last week and made this card. Thanks Julie Kahsin for your inspiration and buying us all the supplies to make this great card.

I am an ice cream addict from way back, so there is no doubt in my mind that this stamp set was made for me!!!! LOL

The card uses a new stamp set called Sweet Scoops. It will be in the Summer Mini Catalog that will premiere to our customers on May 1, 2010. It has a soft swirl ice cream, a pointed sugar cone, sprinkles, and even a stamp to give texture to the ice cream scoops. I can't wait to use this stamp set more and know it will be a hit with customers for summer cards and all kinds of celebrations.

Mary
http://marydirector.stampinup.net/
Stampin' Up! -- Discover Your Creativity
(On-line ordering now available thru my website)

Friday, March 12, 2010

Easter Daffodil Card

Daffodils have always been very special for me. As a kid, each year we couldn't wait for the Daffodil Festival and the big parade. It was so wonderful and so beautiful. So when I saw this new stamp set called Abundant Hope (item #117054 - wood mount OR item #118547 - clear mount), I had to have it. It definitely doesn't have to be used just at Easter, the daffodils are perfect for a Spring card, a Mother's Day Card, or any special occasion.

I used the Scallop Trim Border punch (item #118402) for the accent on the sides. This is a Sale-A-Bration free item thru the end of March. Then using the Watercolor Wonder Crayons (Pg 154 of the main catalog) and blender pens (item #102845), I handpainted the daffodils and leaves. I'm so pleased with the results.

Just a reminder that when you do watercolor items such as the daffodils, for best results it is recommended that you use our watercolor paper. It's on Pg 158 of the main catalog. Here's more information about it:

100% cotton, cold-pressed 140 lb watercolor paper. Sized perfectly to layer on your card front. 3 3/4" x 5". Item #105019 Watercolor Paper (20 sheets) $6.95

If you like my blog and are interested in Stampin' Up! products, I hope that you will consider purchasing your Stampin' Up! products from me. I'm an Independent Demonstrator for Stampin' Up! and absolutely love the products. Stampin' Up! offers such variety and quality in all of their products. You can order 24/7 thru my Stampin' Up! website, or by contacting me directly.

Mary
http://marydirector.stampinup.net/
Stampin' Up! -- Discover Your Creativity
(On-line ordering now available thru my website)

Thursday, March 11, 2010

Top Note Quilt Look Mini Tutorial

I'm having fun with the Big Shot Top Note die. Isn't the quilted look amazing!!! It is so easy to do too. It is called Faux Quilt Technique.

1. Take a 6 x 6 inch piece of paper.
2. Punch out sixteen 1 1/4" squares.
3. Glue the squares to your 6 x 6 paper. Cover 100% of the paper with glue, this is important as you want the square to be secure on the base paper.
4. Allow the quilt glued pieces to dry.
5. Put the paper thru the Big Shot using the Top Note Die (item #113463)
6. Using a Stampin' Basic Black Marker, put tiny Xs on the connecting paper lines. The Xs gives it the hand stitched look.
7. The sentiment was stamped using the Tote-ally Tess stamp set (item #117076 - wood mount OR item #118595 - clear mount) and was punched out using the Tag Punch (item #105934)

I think this is a technique/style that I will use more often. It is a great way to use up scrap paper too.

Mary
http://marydirector.stampinup.net/
Stampin' Up! -- Discover Your Creativity
(On-line ordering now available thru my website)

Wednesday, March 10, 2010

Top Note Shadow - Happy Birthday Card

One of my favorite Big Shot dies is the Stampin' Up! Top Note die, item #113463. It is so versatile. I cut out two. The lighter pink one I cut along the perforated lines so that it would be a perfect fit for the larger one. I accented it with Sweet Pea Stitched Felt flowers, item #117266. I attached them with glue dots which worked out great.

The card base is whisper white card stock that I accented with Pink Passion Classic Ink.

I felt this was a very beautiful birthday card.

Mary
http://marydirector.stampinup.net/
Stampin' Up! -- Discover Your Creativity
(On-line ordering now available thru my website)

Monday, March 8, 2010

Monday Inspiration: Paper Punch Easter Bunny Tutorial

It's Monday Inspiration once again. Today I want to inspire you to use some of your paper punches. If you are like me, I often only use them for the item they were intended. Well, today I want you to be creative with those punches and actually make something with them. Think outside of the box. I hope this tutorial will help you do just that. Thank you Christy Fulk for your inspiration with your bunny card.

I posted this darling bunny on my blog the other day and have received so many wonderful e-mails about him. I hope you will enjoy making the bunny as much as I did.

Here's the photo of the finished card:

Stampin' Up! Supplies Used:

Card Stock:
Whisper White Card Stock, item #100730, use one 4" x 8" piece
Pretty in Pink Card Stock, item #101658, one 4" x 4" and one 5 1/2" x 8 1/2" (for card base)
Basic Black Card Stock, item #102851, scrap piece (dots of eyes)
Bashful Blue Card Stock, item #105120, scrap piece (for eyes)

Paper Punches:
Large Oval Punch, item #107305, for white ears and paws, punch 6
Small Oval Punch, item #107304, for pink inside ears, punch 2
Ornament Punch, item #116794, for white head, punch 1
1 3/4" Circle Punch, item #11204, for white body, punch 1
3/4" Circle Punch, item #107217, for pink paw pads and white cheeks, punch 2 white and 2 pink
1/2" Circle Punch, item #104390, for blue eyes, punch 2
Crop-A-Dile, item #108362, for black pupils and pink toes, punch using 3/16"... 6 pink and 2 black
Scallop Oval, item #114889, for sentiment, punch out after stamping
Small Heart Punch, item #117193, for pink nose, punch 1

MISC:
Classic Stamp Pad - Pink Passion, item #101212
Well Scripted Stamp Set, item #117072 (wood mount) or item #118601 (clear mount)
Stampin' Pastels (chalk), item #105542
SNAIL Adhesive, item #104332
2 Way Glue Pen, item #100425
Bone Folder, item #102300
Paper Snips, item #103579
Stampin' Dimensionals, item #104430


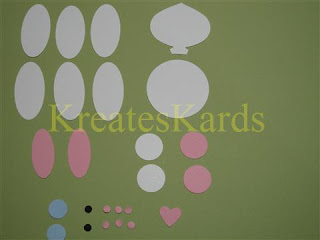
Punch out all of the designs first. See the punch list above for the colors and how many of each one.


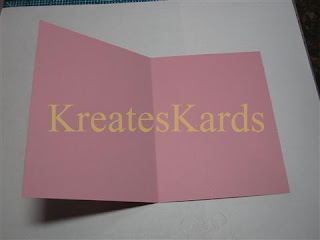
Take the piece of Pretty In Pink Card Stock (5 1/2" x 8 1/2" and bold it in half. Make a crisp crease using the bone folder.


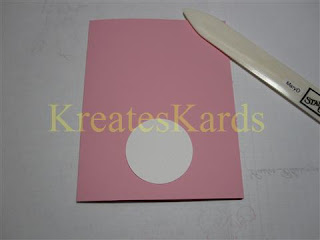
Using SNAIL adhesive, glue the 1 3/4" circle punch on the card. This is the body of your bunny.


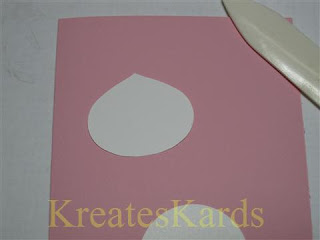
Using your Paper Snips, trim the ornament end off the ornament paper punched design. Do Not glue it to your card yet.


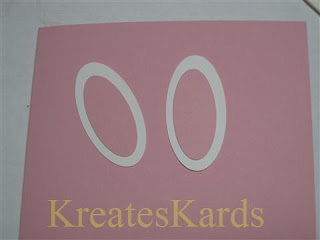
Use two of the Large Ovals for the ears and using SNAIL adhesive, glue the pink small ovals to them.


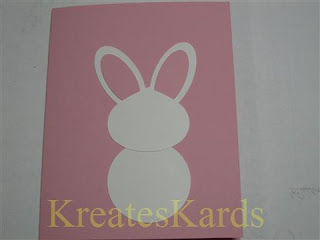
Using SNAIL adhesive, glue the ears to the back of the bunny head THEN glue the head so that it overlaps part of the bunny's body. See photo above.


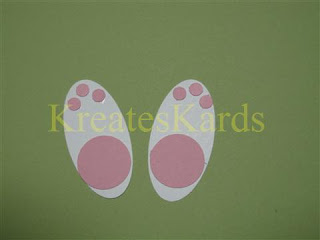
Now you are going to created the feet for the bunny. They consist of 2 large ovals, two 3/4" circles, and the six 3/16" rounds. I used SNAIL on the rounds and the two way glue pen on the tiny rounds (3/16").

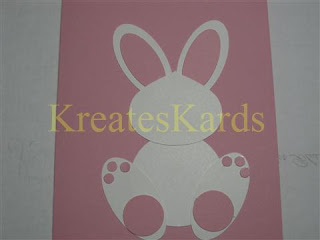
Using SNAIL adhesive, attach the feet to the body of the bunny. Angle them out just a bit and position them just a bit below the body as shown in the photo above.

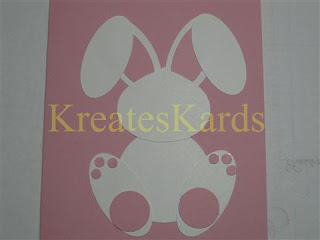
Take the last 2 large white ovals and glue them with SNAIL adhesive to make floppy ears.


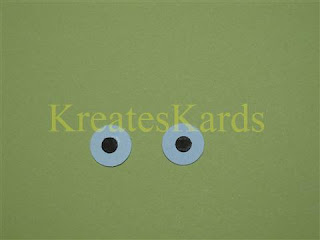
Combining the blue circle and the black tiny rounds will create the eyes. Use the 2 way glue pen to glue the black rounds to the blue. Using SNAIL Adhesive, glue the eyes to the bunny's head.

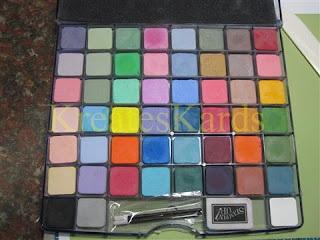
This is the Stampin' Pastels. It is miniature chalks that match our 48 main colors. Using Pink Passion and a Q-tip, I added pink to the bunny cheeks (3/4" white circles).

After the eyes have been put on the bunny's head, then slightly cover them with the pink cheeks as shown above.


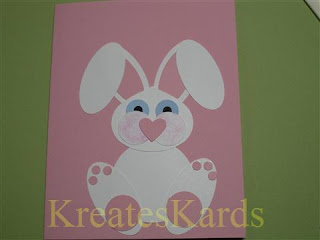
Using SNAIL Adhesive, attach the small heart to form your bunny's nose.


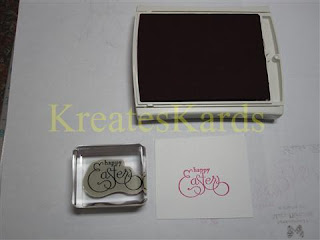
Stamp your sentiment with Pink Passion on Whisper White Card Stock. Then punch out using the Scallop Oval Paper Punch. Attach the sentiment to your card using Stampin' Dimensionals.

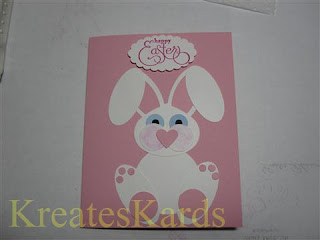
Isn't this the perfect card for Easter or to celebrate the arrival of the Spring Bunny. Hope you will make one too.

All your Stampin' Up! products may be purchased thru my Stampin' Up Website here or by contacting me directly.

Mary
http://marydirector.stampinup.net/
Stampin' Up! -- Discover Your Creativity
(On-line ordering now available thru my website)

You May Also Like:

Blog Widget by LinkWithin