Subscribe via email

Enter your email address:

Delivered by FeedBurner

Sunday, May 31, 2009

Accordion Fold Cards - WOW


As many of you are aware I am an active participant in a group on the Cricut message boards that make "Cards for Soldiers" each month. Once I posted the Accordion Card Tutorial a number of the other participants decided they would make the cards too. The cards above were made by Sue, Phyllis, and Deb. They really made some beautiful cards.


Thank you Phyllis, Deb, and Sue for sharing your creations with us by allowing me to post them on my blog.

Here is the link to the current "Cards for Soldiers" challenge if anyone is interested:

http://www.cricut.com/messageboard/tm.aspx?m=4642725

Mary
http://marydirector.stampinup.net/
Stampin' Up! -- Discover Your Creativity
(On-line ordering now available thru my website)

Saturday, May 30, 2009

Accordion Fold Card Tutorial - Happy Birthday

Today we are going to create an Accordion Fold birthday card. It will fit into an A2 size envelope. This card is very versatile and could be used for any occasion.

Products Used: (all Stampin' Up! and from the Spring- Summer 2009 Idea Book & Catalog unless otherwise stated).

1 piece 5 1/2" x 12" Amost Amethyst cardstock - Item #107078, Pg 155
2 sheets 12" x 12" Tea Party Designer Series Paper - Item #113992, Pg 161
from these 2 sheets (paper is double sided), you will cut:

1 piece 1 1/4" x 5 1/4"
1 piece 2 1/4" x 5 1/4"
1 piece 3 3/4" x 5 1/4"
3 scallop circles
3 - 1" circles

Scallop Circle Paper Punch - Item #109043, Pg 184
1 inch Circle Paper Punch - Item #109046, Pg 184
Bone Folder - Item #102300, Pg 189
SNAIL Adhesive - Item #104332, Pg 191
Elegant Eggplant Classic Stamp Pad - Item #105210, Pg 155
Birthday Wish Stamp - Item #114486, Pg 208

Take your 5 1/2" x 12" piece of Almost Amethyst cardstock and score it at:
4", 6 1/2", 9" and 10 1/2"
IMPORTANT: Leave your cardstock flat, do not fold at score marks yet !!!!!
All the inserts and flowers for this card are cut from the Tea party Designer Series Paper which is double sided. It will give you 6 different designs to chose from, so feel free to mix and match as they all color cordinate beautifully together.

Using SNAIL adhesive, adhere the inserts to the panels of the card, watch your score lines. There are 5 panel sections on the card. You want to be sure to leave the 2nd and 4th panel blank.

Fold/crease your score lines now using the bone folder. This will allow the card to stand on its own.

Using the Scallop paper punch and 1" circle punch, punch out 3 of each design and glue together using SNAIL adhesive.

Adhere the completed flowers to the card. I staggered them, but you can put them on the card in any position. They will act as a tab to open the card.

Now stamp your greeting using Elegant Eggplant and the Birthday Wish Stamp. I stamped it onto a scrap of the Tea Party paper, then punched out with the scallop circle punch.

Here's the finished scallop.


This is what the card looks like after the flowers were added.

This is what it looks like inside with the flowers and the greeting.


The finished card will stand alone. You could substitute the scallop circle with the scallop square, a heart, a circle or any design that would give the same effect.

Hope you enjoyed the tutorial and will sign up as a follower of my blog. Also feel free to leave any comments or questions.

Mary
Stampin' Up! -- Discover Your Creativity
(On-line ordering now available thru my website)

Friday, May 29, 2009

Day of Creating

Hi Everyone,

Thank you for stopping by and checking out my blog today. I'm in the process of creating an accordian fold card tutorial for you. I think that you will really like it. I'm using Almost Amethyst cardstock and Tea Party Designer Series Paper. My favorite color is purple so this was the perfect choice of papers for me to use !!!!

The tutorial should be posted this weekend, so please come back to see it.

Mary
http://marydirector.stampinup.net/
Stampin' Up! -- Discover Your Creativity
(On-line ordering now available thru my website)

Tuesday, May 26, 2009

Cards Made From Calendar Designs.


These are some cards that I made today. Very easy using recycled calendar designs. These are from a 2009 calendar called: Fractal Universe - a 16 month 2009 Calendar edited by Panny Brawley and Keith MacKay. I bought 2 of these calendars in 2008. Am using one as my wall calendar and the other I cut up the fractal designs to use on cards. I'm really pleased with the results. It shows the potential of things we have around the house, that can be recycled such a calendars, wrapping paper, photos, magazines etc. Just be sure that the design is thick enough to support the glue/adhesive you need to adhere it to the card base. Then punch out a stamped saying and attach to the card. Quick and easy.

Fractals are computer generated designs. I think they are amazing. At one time I even made them myself with special software and printed them out in color for cards.

Mary
http://marydirector.stampinup.net/
Stampin' Up! -- Discover Your Creativity
(On-line ordering now available thru my website)

Saturday, May 23, 2009

Never Ending Card Tutorial

The Never Ending Card is absolutely amazing. It would be such a fun gift for a child or an adult and could be use for a birthday card, just because card, or even a celebration. Limitless opportunities.

The card opens to 4 pages. The first page is above.

This is page 2. I had to use the bone folders to add a bit of weight so I could take the photos by myself. It's after midnight and Hal has already gone to bed. I just couldn't wait to get this card up on my blog for you to see.

This is page 3 of the card. I stamped the woody wagon over the center divide. I thought it worked quite well this way.

This is page 4 of the card. Now when you open this page, it then goes back to page 1 and you can start all over again. What fun.

I learned about this technique/card style by watching a video from Dawn. Dawn is a very talented individual. Here's the link to her video:
scroll down a bit on the page to see it.

This card ends up 6" x 6", so will require a special envelope (not a standard envelope). If mailed, probably will require extra postage too because it is an odd size.


I used Just Beachy stamp set with this card. It is item #113796 from Stampin' Up! and are on pg 14 of the occasions mini catalog that is valid Apr 1 - June 30th , 2009. I used the watercolor pencils (Item #101879 on Pg 152 of main catalog). It was a bit time consuming to color all the images in, but so worth it ... don't you agree!

Stampin' Up! -- Discover Your Creativity
(On-line ordering now available thru my website)

Friday, May 22, 2009

Pastel Chalk Backgrounds - Add'l Information

I was doing some experimenting with the chalk technique and discovered that a "metal" flat ruler worked as well as the paper cutter guide and was less bulky to use also. The ruler also gives you exact spacing with doing the lattice look on the background. The Sanford Magic Rub eraser (found mine at Staples 3 to a package for about $2) which is off white works GREAT.

The Magic Rub Eraser comes in a couple of widths. I bought the package of 3 and it is approximately the same size as a mini Post-It note. The photo above shows a post-it note (pink on the left) and the eraser (off white on the right) side by side for comparison. The Magic Rub Eraser is rectangle in shape. Do NOT buy a curved eraser. You will not get the same crisp line with a curved eraser that you get with this type. Stampin' Up! eraser that comes with the pastel chalks is a small off white rectangle eraser, but is only sold with the Stampin' Pastels.

These are 4 different backgrounds I created yesterday using the Pastel chalks, the ruler, and the eraser. The cards are not completed, but it does show you different ways that you can change the backgrounds just by changing the position of the ruler. The yellow one (lower right corner) is one that I used 3 different size erasers for the lines. I like the narrow (Stampin' Up!) one and the medium size (Magic Rub - 3 to a pack) the best. The wider one was another Magic Rub eraser we had at home that was wider than the rest.

Mary
http://marydirector.stampinup.net/
Stampin' Up! -- Discover Your Creativity
(On-line ordering now available thru my website)

Thursday, May 21, 2009

Pastel Chalk Lattice Card #2 - Tutorial

Here is another example of the Pastel Chalk Lattice Card that I showcased yesterday. Today I am giving you a step by step tutorial on how to make this card. Yesterday's card gave you a detailed supply list, so I will not repeat it here today, altho I will give you specifics on colors I used and the papers.

Chalk colors: Lovely Lilac, Pink Passion, and Green Galore.
Classic Stamp Pad: Elegant Eggplant
Designer Series Paper: Tea Party (#113992)

Fold over your white cardstock (I used a top fold) and using a dauber (fits on your finger and has a sponge tip -- it's in upper right hand corner of photo) randomly apply the lovely lilac chalk to the card.

Using the dauber, randomly apply the pink passion chalk to the card. (Note: I have a package of daubers --- if you have only one or two clean on a dry paper towel before applying new color to the dauber. Stampin' Up! sells daubers in packs of 12. Daubers # 102892)

Using the dauber, randomly apply the green galore chalk. Now fill in any blank areas with any of the 3 colors to give it a finished look.

The paper cutter I have from Cricut (many paper cutters are the same type) has a ruler with a cutting space in the middle of that ruler. This is PERFECT size for the eraser to be used in. Stampin' Up! Pastels comes with a small eraser in the kit. I have shown the eraser at the very top of the ruler guide in this photo to show you how it fits into the guide.

Note how the card in on the diagonal for this step of creating the lattice background. Starting at the top, pull the eraser down to the bottom of your card. You may want to do this a couple of times depending on how much you want the line of the lattice defined on your card.

Lift up the guide and move your card over to the left. Line the guide up with the line you just erased (you can see it on the card above). Again, starting at the top pull the eraser down to the bottom. Continue this technique until you get to the end of the card side. Turn card around and do other side of the front of the card.


This shows how the second set of lines are created. It uses the same technique as before. Once completed, set card aside.

Cut out using the 5-Petal paper punch, 4 elegant eggplant and 4 tea party flowers.
The photo above shows the assembly adding in the pink brad at the end. I did use SNAIL adhesive to put the flowers together to keep the petals in place before adding in the brad.


On the back of each flower, add 2 Stampin' Up! dimensionals. Do not remove protective cover on them until ready to put on your card.

Attached flowers to the card.


I used Elegant Eggplant Classic ink to stamp "Happy Birthday to You" on the card. The Happy Birthday to You stamp is called "Birthday Wish" and is on pg 208 of our catalog. It is a single stamp set.

Here is the finished card. I absolutely love this technique and know I will find many ways to use it. You will be amazed at how many different looks you can create just by changing out the colors. Any design (flowers, stars, hearts etc) could be added to the card. If you have a stamp that is a flower vine, that would make a great look too. So many options. I think it would make a perfect wedding card too.

Let me know too if you try this.

Mary
http://marydirector.stampinup
Up! -- Discover Your Creativity
(On-line ordering now available thru my website)

Tuesday, May 19, 2009

Pastel Chalk Lattice Look Card - Tutorial


Yesterday I decided to get out my Stampin' Up! pastel chalks and create a card. I saw the lattice done on a video and thought that I had bookmarked it, now can't find it. Hoping that someone will know the video I'm referring to and e-mail me (or post the link in the comment section) so that I can give proper credit to the person I learned the technique from.

Supplies Needed:
White Card Base (any size white card will work for this)
#105542 Stampin' Pastels Pg 152
#109041 5 Petal Flower Paper Punch Pg 184
DSP (designer series paper) ... your choice for the flowers
#102892 Sponge Daubers Pg 190 (use for applying the pastel chalks to the paper)
#104430 Stampin' Up! Dimensionals Pg 191
#104332 SNAIL adhesive Pg 191
#101227 1/16" circle punch
Brads ... Pg 174 many styles to choose from
Stamp Saying of your choice. (the stamp above is not Stampin' Up!)

Punch out 8 flowers using the 5 Petal Paper Punch. Using SNAIL adhesive glue two flowers together so that the petals are spaced NOT on top of each other. This will give your flower a much fuller look.
Punch the very center of the flower using the 1/16" circle punch.
Put in the brad in the center of the flower and open the brad so that the extension of it lays against the back of the flower.
Put two dimensionals on the back of the flower. DO NOT remove the protective cover.
Set the flowers aside.

Using a dauber, use any combination of Stampin' Pastels that will compliment your flowers. You will want to use 2 to 3 colors (I used blue, green and yellow) to create a background on your card. The chalks are put on randomly and blended together. When you feel you have the perfect combination/look ... STOP.

Stampin' Pastels has an eraser in the holder. Take the eraser out. You will be using it to create the lines/lattice look.
I have a portable paper cutter that has a plastic ruler on it with a cutting guide down the center. Using that guide I was able to create the lines. I removed the cutting blade first. Then lined up my card corner to corner (diagonal lines).
Then I took the eraser in the guide and went from top to bottom of the card.
Move the card over to the left, lining up the end of the just made line with the left side of the guide ruler.
Now put the eraser in the guide opening and erase again.
Keep doing this till the full background is done.
Now lay the card diagonally in the opposite direction.
Follow the same directions as above.
You should now have a nicely latticed background.

Remove the protective film from the dimenstionals on your flowers.
Put one flower in each corner of the card, pressing to adhere.
Stamp your saying in the middle of the card.

Very easy card to make. Hope you will give it a try.
If I can't find the video, I will post additional photos later to show how the card is positioned in the cutter.

Stampin' Up! -- Discover Your Creativity
(On-line ordering now available thru my website)

Sunday, May 17, 2009

Matching Desk Set Tutorial


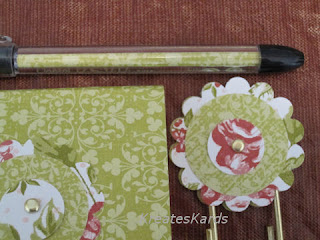
We also made a matching desk set at our Workshop yesterday which included a post-it note cover, bookmark, and matching pen. This is a quick, easy, and inexpensive gift to make. It definitely has the WOW factor I think, and it only uses 1 piece of 12 x 12 cardstock. This month Stampin' Up! is having a wonderful promotion on paper. If you buy 3 packages of Designer Series Paper - DSP (Pg 158 thru 161 of our main catalog) you will receive one package FREE. These projects have the most unique look is using 2 sided cardstock. All of our designer series cardstock is 2 sided.

Items used: (all items are from the main Stampin' Up! catalog unless otherwise noted)

#112041 Bella Rose DSP cardstock Pg 159
#112158 Perfect Plum DSP cardstock Pg 159 (for the red and for the green set above)
#104337 Gold Brads (3 needed total for the set) Pg 174
#101277 Handheld punch 1/16" circle Pg 184
#104294 Sticky Strip Pg 191
#104430 Dimensionals Pg 191
#104332 SNAIL Adhesive Pg 191
#109043 Scallop Circle Paper Punch Pg 184
#104401 Circle Paper Punch 1 3/8" Pg 184
#107217 Circle Paper Punch 3/4" Pg 184

Jumbo Gold Paperclips -- purchased at Staples. They come 10 to a package.
Pental RSVP pens -- purchased at Staples, pack of 5. I have also seen them at the 99 cents store in packs of 2.

Designer Pen:
The directions for the Designer Pens is found at:

(NOTE: I made my paper insert 3 1/2" x 3/4" rather than 3 1/2" x 7/8" and found it much easier to work with. Also cut out a few extras, they sometimes do not go in as smoothly as I had hoped. So this way you have a backup to try again. They are worth the effort.)

Bookmark:
The bookmark is extremely easy to make.
Punch out 3 each of the scallop circle, 1 3/8" round, and the 3/4" round.
Decide which color you want to be the main color that you will be using for the post-it note and pen, then use the opposite side for the scallop, the main for the 1 3/8", and the opposite for the 3/4".
Using SNAIL, glue the 3 pieces of the "flower" together. You will have 3 flowers.
Punch a hole in the center of each flower using the 1/16" circle paper punch.
Push the gold brad thru and open the brad to tighten.
Lay one flower face down on the work surface. Put the paperclip on top (making sure is above the double area of the clip). Position 3 dimensionals on the flower's back - be sure one is inside the paperclip area. Pull off protection piece on the dimensionals so it is sticky on the exposed side.
Take your second flower and position over the first with the clip, lining up the scallops, and press together.
Bookmark is now done.

Post-it Note Cover:
Cut a piece of designer series paper 3 1/4" x 6 1/2"
Apply sticky strip to the back of the post-it note pad.
Position the pad over one end of the DSP, allowing a slight edge to show of the designer series paper. Press into place.
Now gently work the paper up and over the top of the note pad.
I add it a small strip of sticky strip to the top of the glued edge of the note pad so that it will adhere to the DSP.
Using 3 dimensionals, adhere your last scallop flower to the top of the cover.

I hope that many of you will try these projects. They are easy to do, inexpensive to make, and really are a nice gift.

Mary

http://marydirector.stampinup.net/

Stampin' Up! -- Discover Your Creativity
(On-line ordering now available thru my website)


You May Also Like:

Blog Widget by LinkWithin