With the sun ray/sun burst technique, you can use any color of ink that you would like. Here I used one of the In Colors called Island Indigo, item #126986 Classic Ink.
Here's is the video I created showing how to make the Sun Ray Sponging Technique, Clouds, and other effects. Hope you enjoy it. If you are reading this via e-mail, you will need to come to my blog to view it:
Next week I will post individual photos and more details of the cards shown in the video. These cards also include some sneak peeks from the Stampin' Up! Holiday Mini.
You may order from my Stampin' Up! website 24/7 by CLICKING HERE, then click on Shop Now or by contacting me directly. My e-mail link is at the top of the screen.
Mary Director
Stampin' Up! Senior Supervisor,
Independent Demonstrator & Creative Coach http://marydirector.stampinup.net
Stampin' Up! -- Discover Your Creativity
(On-line ordering now available thru my website)
Doesn't this look just like a sunrise coming up over the mountain. The trees are from the Lovely As a Tree Stamp Set, item #115026 - Wood OR #127793 - Clear.
You may order from my Stampin' Up! website 24/7 by CLICKING HERE, then click on Shop Now or by contacting me directly. My e-mail link is at the top of the screen.
Mary Director
Stampin' Up! Senior Supervisor,
Independent Demonstrator & Creative Coach http://marydirector.stampinup.net
Stampin' Up! -- Discover Your Creativity
(On-line ordering now available thru my website)
This is a sponging technique used to create the look of rays of sunshine as the background. I hope to have a video to show how it is done. In the meantime, I am going to post samples the next few days.
I used So Saffron Classic Ink from Stampin' Up! for the background.
You may order from my Stampin' Up! website 24/7 by CLICKING HERE, then click on Shop Now or by contacting me directly. My e-mail link is at the top of the screen.
Mary Director
Stampin' Up! Senior Supervisor,
Independent Demonstrator & Creative Coach http://marydirector.stampinup.net
Stampin' Up! -- Discover Your Creativity
(On-line ordering now available thru my website)
Very Vanilla Card Stock, item #101650 (1 piece 3 ¾” x 5”)
Embossing Buddy, item #103083
Heat Tool, item #100005
VersaMark Ink, item #102283
Stamping Sponges, item #101610
My Friend Stamp Set, item #122585 – Wood Mount OR item #122587 – Clear Mount
Directions:
Score Wild Wasabi piece of card stock at 4 ¼” and crisply fold.
Gently rub the embossing buddy over the Very Vanilla Card Stock.Tap off to remove excess powder if any.
Stamp My Friend in upper right corner using Wild Wasabi Classic Ink.
Stamp floral design in VersaMark Ink, then on the card stock
i.Dust liberally with Wild Wasabi or Clear Embossing Power – tap off excess
ii.Heat set
iii.If you used clear, you will sponge Wild Wasabi Classic Ink over the image then wipe off with a tissue or soft cloth.
iv.If you used Wild Wasabi, you have completed the design.
Attach to the card front using SNAIL.
You may order from my Stampin' Up! website 24/7 by CLICKING HERE, then click on Shop Now or by contacting me directly. My e-mail link is at the top of the screen.
Mary Director
Stampin' Up! Senior Supervisor, Independent Demonstrator & Creative Coach
Concord Crush, Poppy Parade, Peach Parfait - top row
Vanilla - bottom row
When you order the Vanilla Rosettes, you will receive a package of 18 (6 each of 3 different sizes - 1/2" 3/4", and 1"). The Rosettes are 100% polyester. Mini glue dots are used to adhere the flowers to your projects.
To change the color of the rosette, use a Stampin' Write Marker in the color of your choice. Use the wide tip and start coloring in the petals. I used a pair of tweezers to rotate the rosette and also to flip it over. Allow to dry thoroughly before using. The color will not be an exact match to the marker, but will compliment it beautifully.
Rosette, Vanilla (18), item #116774
You may order from my Stampin' Up! website 24/7 by CLICKING HERE, then click on Shop Now or by contacting me directly. My e-mail link is at the top of the screen.
Mary Director
Stampin' Up! Senior Supervisor, Independent Demonstrator & Creative Coach http://marydirector.stampinup.net
Stampin' Up! -- Discover Your Creativity
I used Ice Cream Parlor Designer Series Paper & Quick Accents Pack from the Sale-a-Bration Brochure, item #122242. It was a perfect match for the accenting of these two cards plus the cards I showcased yesterday on my blog.
For the Melted Crayon Technique, I am going to recommend that you use a craft iron or an iron that does not have steam and is specifically used for crafts. The one I have is very small (less than 5") and has a non-stick plate. I do not recommend this technique for children as the iron gets very hot and we are working with melted crayons that are also hot. Be very careful when doing this technique and do not leave your iron unattended.
Have a piece of Glossy White Card Stock cut to your desired size.
Place it on a larger piece of foil. (set mine on a large bread board.
Heat your iron.
Hold the iron so that the plate is facing upward.
Run your crayon over the plate of the iron. It will melt immediately.
Do the same with the next color (2 or 3 colors is great).
Now turn the iron over so that it is in the normal position and go over the glossy white card stock.
(apply some pressure and move quickly --- remember this is paper and it can scorch or overheat).
Repeat if needed. Both cards above, I did twice to cover the complete area.
Unplugged iron, and immediately clean the plate with a damp paper towel.
Allow iron and card to cool completely.
Once card is cooled, decorate as desired.
I love the effect this technique gives. What do you think?
Stampin' Up! does carry Glossy White Card Stock, item #102599 (25 sheets to a pkg ... $5.95)
You may order from my Stampin' Up! website 24/7 by CLICKING HERE, then click on Shop Now or by contacting me directly. My e-mail link is at the top of the screen.
Mary Director
Stampin' Up! Senior Supervisor, Independent Demonstrator & Creative Coach http://marydirector.stampinup.net
Stampin' Up! -- Discover Your Creativity
(On-line ordering now available thru my website)
Both of the designs above were created using crayons slivers and an iron.
I put the crayons in an open style pencil sharpener (be sure this is clean as you don't want pencil lead on our card). Using both a blue and a pink crayon, I spread the slivers of crayon over the glossy white card stock.
A piece of foil was under the card base before starting. Then when I had enough color on the base, I put a piece of foil over the top. I have a "craft" iron with no steam that when heated up was used to go over the top piece of foil causing the crayon slivers to melt. Gently lift the foil. If not completely melted, replace the foil and reheat the foil to melt the crayons. Remove top foil.
Be sure to unplug your iron.
It will be hot, allow to dry. Then decorate any way you would like. I used Ice Cream Parlor Designer Series Paper & Quick Accents Pack from the Sale-a-Bration Brochure, item #122242. It was a perfect match. Watch my blog tomorrow for another crayon background technique.
These crayon techniques are not recommended for children. The iron and the crayons can become very hot. Also remember you are working with paper which can scorch and burn. Please be careful if you try these techniques.
You may order from my Stampin' Up! website 24/7 by CLICKING HERE, then click on Shop Now or by contacting me directly. My e-mail link is at the top of the screen.
Mary Director
Stampin' Up! Senior Supervisor, Independent Demonstrator & Creative Coach http://marydirector.stampinup.net
Stampin' Up! -- Discover Your Creativity
(On-line ordering now available thru my website)
Thank you Mary Fish for showing the Cross Stitch Technique on your blog. It inspired me to try it myself.
I punched out 2 rows using Dotted Scallop Ribbon Border punch, item #119275 from Stampin' Up!. I used embroidery thread to create the cross stitch pattern on both pieces.
Think these will be a GREAT accent to any card. They could be done in so many colors using embroidery floss or thread.
You may order from my Stampin' Up! website 24/7 by CLICKING HERE, then click on Shop Now or by contacting me directly. My e-mail link is at the top of the screen.
Mary Director
Stampin' Up! Senior Supervisor, Independent Demonstrator & Creative Coach http://marydirector.stampinup.net
Stampin' Up! -- Discover Your Creativity
(On-line ordering now available thru my website)
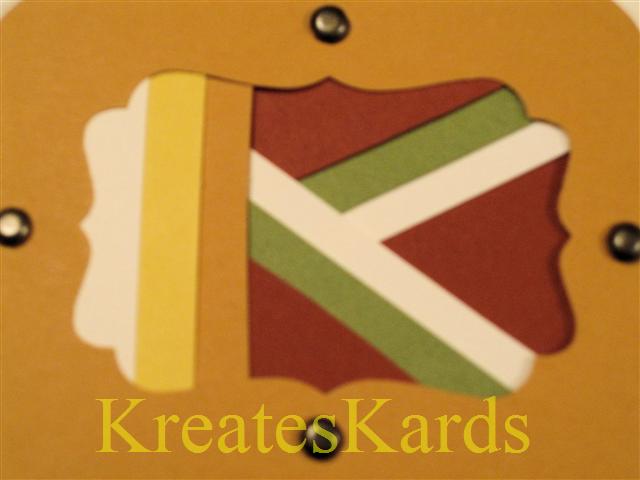
The other night I was prepping card stock for my Stampin' Up! classes that I am teaching this weekend. I was amazed at the small pieces of card stock that I had left over and it seemed such a shame just to toss them out. I started playing with the scraps by placing them behind a punched out image. I used scotch tape to adhere them to the back side. When completed I took a larger piece of
card stock and covered all the loose ends. Then used my Crop-A-Dile to punch holes and insert brads. Finished design was placed on a card base using dimensionals.
Here are my samples of what I made. Please let me know what you think. There is truly no pattern, you just start playing and placing with scraps of card stock.
This is a close up of one of the patterns I created. Each color/line is a piece of card stock.
The sky is the limit on what you could crate doing this. Filled in designs could be large or small. Just remember it will add some bulk to your card, so if planning to mail the card don't get it too thick. This technique truly will give you one of a kind original cards.
The corner frames on the card were created by using: (cutting 4 of each colors and layering)
Photo Corners Extra Large Paper Punch, item #119878
Punched out design for the layering technique was created using:
Decorative Label Extra Large Paper Punch, item #120907 (Holiday Mini Catalog)
All products used were from Stampin' Up!.
You may order from my Stampin' Up! website 24/7 by CLICKING HERE, then click on Shop Now or by contacting me directly. My e-mail link is at the top of the screen.
Mary Director
Stampin' Up! Senior Supervisor, Independent Demonstrator & Creative Coach http://marydirector.stampinup.net
Stampin' Up! -- Discover Your Creativity
(On-line ordering now available thru my website)
The other day on my blog I showed you a card I had completed using the Faux Tearing and Masking Technique. Here's the video I did to show you how to create this technique yourself. It is so versatile, I think you will really like this. If you are reading this from e-mail, you will need to come to my blog to view the video.
You may order from my Stampin' Up! website 24/7 by CLICKING HERE, then click on Shop Now or by contacting me directly. My e-mail link is at the top of the screen.
Mary Director
Stampin' Up! Senior Supervisor, Independent Demonstrator & Creative Coach http://marydirector.stampinup.net
Stampin' Up! -- Discover Your Creativity
(On-line ordering now available thru my website)
My video today will show you 4 different ways to change the look of ribbon using a sponge dauber, sponge, craft ink, Shimmer Mist, and rubber stamp all from Stampin' Up!.
This was done using a sponge dauber by rubbing it across the ribbon using Shimmer Paint - Platinum.
This scallop look was created using the sponge dauber, Shimmer Paint - Platinum, and by pressing the dauber image along the edges.
This look is my favorite. It gives a speckled look to the ribbon using a Stampin' Sponge and Shimmer Paint. The harder you press the sponge, the more intense the color and filled in area. I like using the lighter touch on these as shown in the bottom two ribbons.
I used the Stampin' Up! Confetti Stamp Set and Whisper White Craft Ink. LOVE THIS. The craft ink takes a bit longer to dry, but worth the wait. You can really customize ribbons with stamps, adding in any design you desire.
Very Vanilla Grosgrain Ribbon was stamped with Marina Mist Classic Ink. The ink bleeds into the fibers, but still gives a customized look to the ribbon.
Here's my video to show you how to create each look:
Stampin' Up! Products Used:
Shimmer Paint Platinum, item #116807
Shimmer Paint Frost White, item # 116854 (not shown)
Shimmer Paint Champagne Mist, item #116806 (not shown)
Stamping Sponges, item #101610 (3 to a package)
Sponge Daubers, item #102892 (12 to a package)
Confetti Stamp Set, item #116960 - Wood Mount OR #120465 - Clear Mount
Whisper White Craft Ink, item #101731
Marina Mist Classic Ink, item #119668
5/8" Satin Ribbon, Basic Black, item #117285
5/8" Satin Ribbon, Real Red, item #117286
5/8" Grosgrain Ribbon, Very Vanilla, item #109055
I hope you enjoyed today's tutorial. There are so many ways you can change the look of your ribbon and give your cards and scrapbooks a true customized look. Have fun being creative.
You may order from my Stampin' Up! website 24/7 by CLICKING HERE, then click on Shop Now or by contacting me directly using my e-mail link at the top of the page.
Mary Director
Stampin' Up! Senior Supervisor, Independent Demonstrator/Creative Coach http://marydirector.stampinup.net
Stampin' Up! -- Discover Your Creativity
(On-line ordering now available thru my website)
Lovely as a Tree Stamp Set, item #115026 - wood only
Using the sponging technique on any card or punched out image can add such depth and dimension. In this video I show how you can do this sponging technique easily with our Stamping Sponges or Sponge Daubers.
Stamping Sponges, item #101610 (3 to a package) Sponge Daubers, item #102892 (12 to a package)
I always cut my sponges into 6 pieces using my Paper Snips (scissors), item #103579. I wash both the sponges and the sponge daubers out with warm water and soap, rinse thoroughly and then air dry. If needed you can clean them with Stampin' Mist, item #102394 but not really necessary.
If you are reading this blog entry via e-mail, you will need to visit MY BLOG to view the video.
Thank you for visiting my blog today. I hope you enjoyed the video.
Mary Director http://marydirector.stampinup.net Stampin' Up! -- Discover Your Creativity (On-line ordering now available thru my website)
This technique gets a "WOW" rating in my book. What do you think, do you agree?
The video below (if you are reading this via e-mail, you need to come to the blog to view the video) shows step by step directions of how to create this technique. It is easy BUT drying time takes 24 hours. This is not a card you would make at the last minute. You could tho create some acrylic/acetate pieces and have them set aside for a last minute card.
IMPORTANT NOTE: If you use too dark of ink refills, your design will not show up. The colors should be light to medium or very tiny amount of dark ink. I used Concord Crush and it overpowered the image I had stamped.
Hope you will try this technique, and if you need Stampin' Up! products please CLICK HERE to order them thru my website. Once you are on the website, then you click shop now.
The other day on my blog I showed some photos of stamped images I had used to create my own designer series paper. In the process of stamping these images I used my own handmade ink stamp pad. Tonight I decided to create two tutorials to show you how you can create your own stamp pads too. The Stampin' Up! Classic Ink Refills are PERFECT for this project. They are available in so many colors and with combining them on a self made stamp pad, the color combinations are endless.
Part I video show how to create the stamp pad using craft felt (white is the best choice):
Part II is a continuation and show how to make the stamp pad using baby wipes or hand wipes;
I hope you enjoyed the videos and that you will find them helpful.
Stampin' Up! products used in sample above and in the videos: Concord Crush Classic Ink Refill, item #119675 Blushing Bride Classic Ink Refill, item #119676 Pear Pizzazz Classic Ink Refill, item #119674 Whisper White Card Stock, item #107730 Just Believe Stamp Set, item #116948 wood OR item #120453 clear mount (use in photo) Sentimental Journey Stamp Set, item #118513 wood OR item #120075 clear mount (used in both videos) - this set only available until the end of August.
You may order these items on-line thru my Stampin' Up! website by clicking HERE and then click on Shop Now.
Monday Inspiration: It is fun. It is easy to do. It is Zentangle. Let yourself go and create a card using Zentangle.
No idea what Zentangle is. Me neither, up until recently. Here's some background on this technique:
http://www.zentangle.com/about-what-is--1.php "What is Zentangle? Zentangle is an easy to learn method of creating beautiful images from repetitive patterns. It is a fascinating new art form that is fun and relaxing. It increases focus and creativity. Zentangle provides artistic satisfaction and an increased sense of personal well being. Zentangle is enjoyed by a wide range of skills and ages and is used in many fields of interest. We believe that life is an art form and that Zentangle is an elegant metaphor for deliberate artistry in life. "
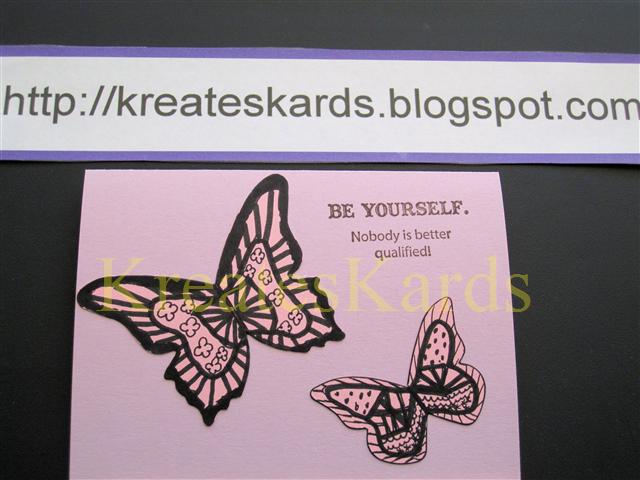
After seeing a few samples, it hit me: Wow, I use to do this as a kid. In fact, I loved doing it as a kid so why not try again. Here are my first attempts at this.
This one I just took white card stock and started to doodle. Used Elegant Eggplant Stampin' Write Marker.
Then decided to try it with images cut out with the big shot:
Butterflies were my favorite so far. I used both the fine and bold tips of the Stampin' Write Basic Black Markers on the butterflies and the following cards.
Star shape Zentangled.
This one is two of the Big Shot Scallops Zentangled and then layered. Thought it looked a bit like a flower.
If you got to YouTube, you will find many videos on this technique too. There is no right or wrong way to create a Zentangle. They are fun too to incorporate into a card. Hope this has inspired you to try and make some too. CLICK HERE for videos on YouTube.
You can shop with Stampin' Up! 24/7 on my Stampin' Up! Website by clicking HERE.