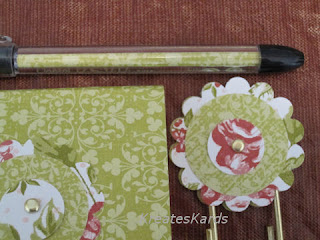


We also made a matching desk set at our Workshop yesterday which included a post-it note cover, bookmark, and matching pen. This is a quick, easy, and inexpensive gift to make. It definitely has the WOW factor I think, and it only uses 1 piece of 12 x 12 cardstock. This month Stampin' Up! is having a wonderful promotion on paper. If you buy 3 packages of Designer Series Paper - DSP (Pg 158 thru 161 of our main catalog) you will receive one package FREE. These projects have the most unique look is using 2 sided cardstock. All of our designer series cardstock is 2 sided.
Items used: (all items are from the main Stampin' Up! catalog unless otherwise noted)
#112041 Bella Rose DSP cardstock Pg 159
#112158 Perfect Plum DSP cardstock Pg 159 (for the red and for the green set above)
#104337 Gold Brads (3 needed total for the set) Pg 174
#101277 Handheld punch 1/16" circle Pg 184
#104294 Sticky Strip Pg 191
#104430 Dimensionals Pg 191
#104332 SNAIL Adhesive Pg 191
#109043 Scallop Circle Paper Punch Pg 184
#104401 Circle Paper Punch 1 3/8" Pg 184
#107217 Circle Paper Punch 3/4" Pg 184
Jumbo Gold Paperclips -- purchased at Staples. They come 10 to a package.
Pental RSVP pens -- purchased at Staples, pack of 5. I have also seen them at the 99 cents store in packs of 2.
Designer Pen:
The directions for the Designer Pens is found at:
(NOTE: I made my paper insert 3 1/2" x 3/4" rather than 3 1/2" x 7/8" and found it much easier to work with. Also cut out a few extras, they sometimes do not go in as smoothly as I had hoped. So this way you have a backup to try again. They are worth the effort.)
Bookmark:
The bookmark is extremely easy to make.
Punch out 3 each of the scallop circle, 1 3/8" round, and the 3/4" round.
Decide which color you want to be the main color that you will be using for the post-it note and pen, then use the opposite side for the scallop, the main for the 1 3/8", and the opposite for the 3/4".
Using SNAIL, glue the 3 pieces of the "flower" together. You will have 3 flowers.
Punch a hole in the center of each flower using the 1/16" circle paper punch.
Push the gold brad thru and open the brad to tighten.
Lay one flower face down on the work surface. Put the paperclip on top (making sure is above the double area of the clip). Position 3 dimensionals on the flower's back - be sure one is inside the paperclip area. Pull off protection piece on the dimensionals so it is sticky on the exposed side.
Take your second flower and position over the first with the clip, lining up the scallops, and press together.
Bookmark is now done.
Post-it Note Cover:
Cut a piece of designer series paper 3 1/4" x 6 1/2"
Apply sticky strip to the back of the post-it note pad.
Position the pad over one end of the DSP, allowing a slight edge to show of the designer series paper. Press into place.
Now gently work the paper up and over the top of the note pad.
I add it a small strip of sticky strip to the top of the glued edge of the note pad so that it will adhere to the DSP.
Using 3 dimensionals, adhere your last scallop flower to the top of the cover.
I hope that many of you will try these projects. They are easy to do, inexpensive to make, and really are a nice gift.
(On-line ordering now available thru my website)

6 comments:
OMG!!! These are beautiful, I could totally make these! Thanks so much for sharing the instructions....did I mention these are gorgeous?!
What great ideas! Perfect for end of year teacher gifts. The kids can even do them I bet!
Those are so cute! Great Job!!!
These cards are so cute and creative! I'm gonna try to do this next month for my mother's birthday.
I know you posted this a long time ago, but I just made three sets of these for the secretaries at my daughter's school for Christmas. I am going to wrap them together in a treat bag and tie a nice ribbon on it with a THANK YOU tag.
Thanks for posting the instructions!
Kendra, you are very welcome. Glad you were able to use these. Stop by my new BLOG: http://www.kreateskards.com/ when you have time. It is loaded with lots of new ideas too.
Post a Comment