This card will fit into an A2 size envelope. I made these as birthday cards, but you could use them for any occasion just by switching out the designs.
 Here's the card we are going to make, it is called a Secret Fold Card because there is truly a secret area in it that can be opened if you fold the card properly. It has been created using Stampin' Up! supplies:
Stampin' Up! Supplies Used:
Early Espresso Classic Ink, item #119670
Basic Gray Card Stock, item #121044 .... 1 piece 5" x 8", 1 piece 3" x 2"
Daffodil Delight Card Stock, item #119683 ... 1 piece 3 1/2" x 2 1/2"
Old Olive Card Stock, item #100702 ... 1 piece 1 7/8" x 5 ", 1 piece 2 1/2" x 1 1/2", and one scrap for a medium oval punched out twice.
Medium Oval Punch (sneak peek) .. 3/4"x 15/16" oval punch will be available September 1st.
Fox & Friends Stamp Set, item #117020 - wood OR item #118565 clear mount.
Teeny Tiny Wishes, item #115370 - wood only
Designer Buttons, Brights, item #119747 (optional)
Multipurpose Liquid Glue, item #110755 (if you use the button on the card)
SNAIL Adhesive, item #104332
Bone Folder, item #102300
Paper Cutter, item #104152 .....Blade Refill, item #104153 .... Cutting & Scoring Blade Refill, item #104154
Directions:
 Score the large piece of Basic Gray Card Stock at 2", 4" and 6"
 Put the card stock into the paper cuter so that the score lines are going left to right.
Position your blade at the top score line cutting to the lower score line (hope you can see in the photo).
Cut at 1 1/4", 2 1/2", and 3 3/4" (be sure it cuts from the 2" score line down to the 6" score line).
 Using the bone folder, fold and crease the fold lines. I put them upper and lower to show you the cuts more clearly.
 Weave one of the pieces of Old Olive Card stock (1 7/8" x 5") thru the card slots.
 Now take the other piece of 1 7/8" x 5" Old Olive Card Stock and weave it the opposite way.
The first piece started on the top.
The second piece started underneath.
This is KEY to making the secret fold work.
 This is the completed weave. Each row is the opposite of the other.
 Using SNAIL Adhesive, layer the Old Olive (2 1/2" x 1 1/2") onto the Basic Gray (3" x 2"), then layer that onto the Daffodil Delight (3 1/2" x 2 1/2").
 Using SNAIL Adhesive only on the upper third of this, attach to the card base.
Center left to right and top to bottom as you place it.
 Punch out two small ovals. Using SNAIL Adhesive glue them together to form a button. Now add adhesive to the bottom half of the button you just made.
Hold down the card flap, the position the button so that the card flap can go underneath but not be glued to the button.
(NOTE: If you use a real button for this step, use liquid multipurpose glue and only glue the bottom half of the button ... let completely dry before sliding card flap under the edge).
 Stamp your front image.
 Stamp the first set of interior images. Be careful to stay on the Old Olive Card Stock when stamping.
 Fold the card in the center and then separate the secret fold.
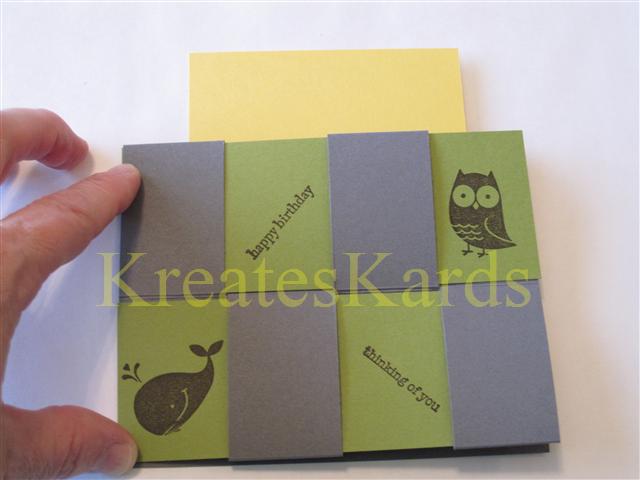 Now stamp your Secret Fold images.
 Here are 3 that I made tonight.
ON-LINE ORDERING for Stampin' Up! Products 24/7
Mary
http://marydirector.stampinup.net
Stampin' Up! -- Discover Your Creativity
(On-line ordering now available thru my website)
1 comment:
Thanks so much for that awesome tutorial!! I can't wait to try one of these. Love your blog!
Post a Comment